Oct 28 • Robert Hean

Creating Rovo Agents for Complete Beginners: What to Build First

Key Takeaways

Start with one clearly defined Rovo agent use case, such as checking whether a project request includes an owner, deadline, scope, and source materials. A narrow first job is easier to test than asking one agent to manage every Jira and Confluence task at once.

Before asking an agent to create work, gather the full project brief. If you do one thing, do this: require the project goal, audience, due date, dependencies, and approval owner before work moves forward.

Keep a person in the review loop for agent outputs, especially when an agent creates Jira issues or Confluence pages. Give the agent only the access it needs, then use automation to run it at useful moments, such as when a new request form is submitted or a project status changes.

Stuck before your first Rovo agent even works

You open Rovo, see a blank agent setup, and spend two hours trying to make it handle every project request at once. One learner stopped there, while other beginners who had never created an agent started by choosing one small, repeatable task instead.

Start with a job that has a clear input and a useful output. If you do one thing first, write a one-sentence brief: “When a teammate submits a project request, check for missing details and return the questions they need to answer.” A first agent does not need to assign work, edit records, or contact customers.

Choose a first job with clear boundaries

A practical first agent works best when the request follows a familiar pattern. For example, a project coordinator could use it to review intake requests, a team lead could use it to summarize weekly updates, or a support manager could use it to sort recurring questions.

Avoid a vague goal such as “manage our projects.” The more specific and focused you can make your agent, the more likely it is they'll  Instead, define three parts before you build:

  • Input: a form response, message, or page with known fields

  • Check: missing owner, due date, goal, budget, or priority

  • Output: a short list of gaps and the next questions to ask

Plan safe execution before adding actions

Next, decide what the agent may do without a person checking its work. For a first version, keep it in review mode: it can flag missing information and draft a reply, but it should not send messages, change project dates, or share restricted details.

This tradeoff matters. Automatic actions save time only when the rules are stable; they fail when requests are unclear or exceptions are common. Test the agent with five past requests, including one complete request, two incomplete requests, and two unusual cases, then adjust its instructions based on where its output misses the mark.

Turn incomplete project requests into a useful intake agent

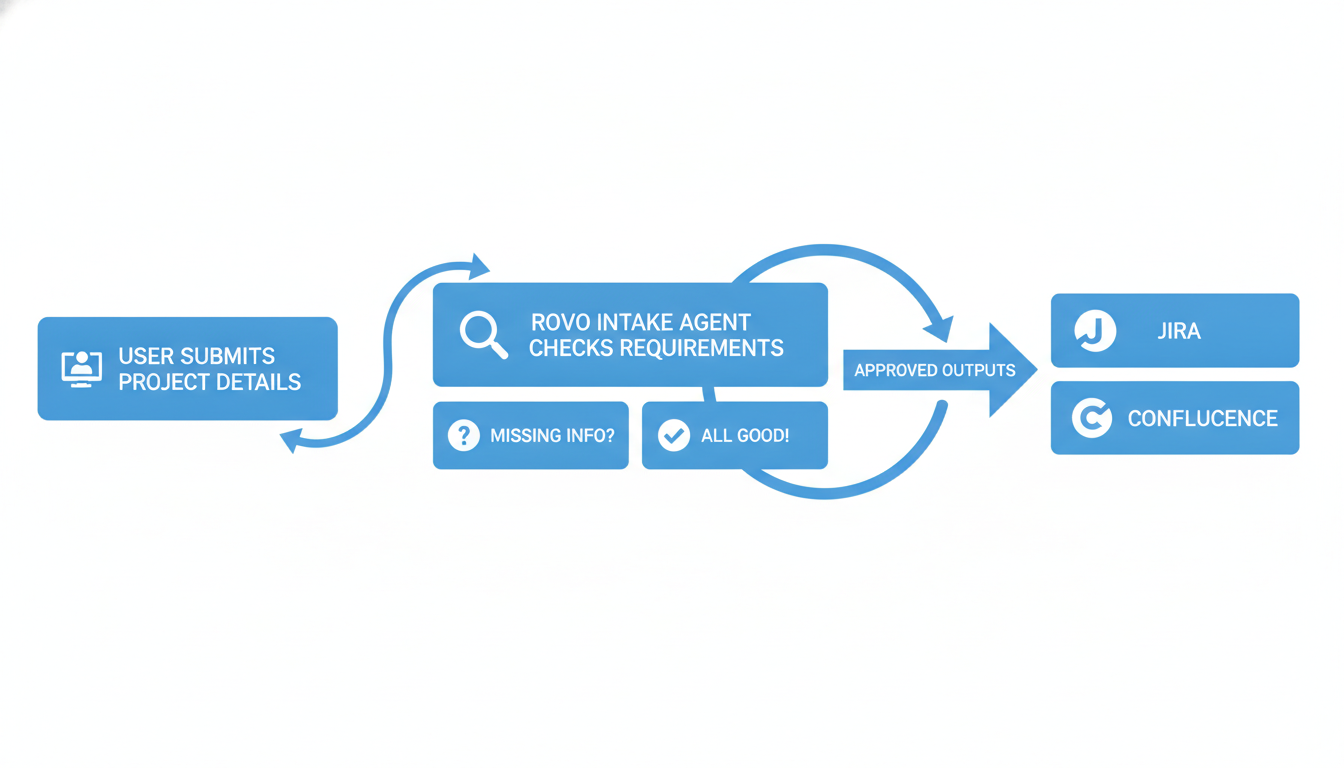
Next, use an intake agent when a request arrives as two vague sentences such as, “We need a new customer portal by summer.” That request may lack the people who must approve it, the budget range, the deadline, the success measure, and even the reason the work matters.

Ask the agent to pause before creating work. It should collect stakeholder names, timeline, budget, goals, acceptance criteria, assumptions, and known risks, then show the requester what is still missing. If you do one thing, make acceptance criteria required: they turn “make it better” into observable results such as “a support agent can find an order in under three clicks.”

Create the right outputs from complete information

So, once the required answers are present, the agent can create an Epic in the requester’s chosen Jira space and a project charter in the chosen Confluence space. The Epic should capture the goal, owner, target date, scope, and acceptance criteria, while the charter records context, assumptions, decisions, and measures for success.

Templates keep each setup consistent without forcing every project into the same shape. For example, require an Epic owner and target outcome, but leave optional fields for dependencies or procurement needs. This works well for repeatable internal requests; it fails when the agent guesses missing information, so route unclear answers back to the requester instead of filling gaps itself.

Keep Rovo access and outputs under control

You can also determine who should be able to edit, manage and use an agent, so you should decide who can use your agent before you share it. A project coordinator may need an intake agent every day, while a whole-company rollout can expose project details, drafts, and prompts to people who do not need them. 


Start with Atlassian groups instead of opening access to every user. In Studio, choose the setting that matches the job: Open to all for low-risk internal helpers, Open to Assigned Atlassian Groups for a defined team, or Closed to all while you build and test. If you do one thing, assign access to a small group first and widen it only after the agent has been checked in real work.

Verify before you trust

Next, treat every agent response as a draft until a person checks it. An intake agent can spot missing dates, owners, or acceptance criteria, but it can also misunderstand a vague request or repeat an incorrect detail from the prompt. A good path for this would be to allow only a few people to use the agent and ask them to test it out. This get some real scenarios who avoiding exposing it to EVERYONE.

Before sending an output to Jira or Confluence, inspect the prompt, verify key facts, scan for sensitive information, and check that the result matches the original request. For example, a delivery lead should confirm the project owner, due date, and scope before creating a Jira issue. The practical rule is simple: trust, but verify, and verify again.

Design triggers and tracking that make agents practical

You can also make an agent an action within an automation. This means you can schedule them running, have them run when a work item is created, or based on an agent needs a clear event that tells it when to act. It will not notice a finished piece of work on its own, or automatically run without this, so connect recurring work to an automation rule that runs at the right time.


For example, when a project lead applies a Completed label to an Epic, use that change to start a follow-on task. The agent can create a first-draft project charter with the Epic goal, owner, linked work items, key dates, and open risks. If you do one thing, define one trigger for one repeatable job before adding more conditions.

Make changes easier to review

Next, keep a running record of each agent change in a ticket or Confluence page. Include the trigger, the input used, the output created, who reviewed it, and whether the result needed edits. A project coordinator can review this list weekly and spot patterns, such as charters missing a risk section or triggering before an Epic is truly ready.


Keeping a running list of these is important, since (as of writing) there is no dedicated Rovo Agent action log that records every skill invocation, tool call, or reasoning step. That makes your own review record important, especially when an agent creates work that other people will rely on.

  • Record the automation trigger and the date it ran

  • Link to the Epic, charter, or ticket the agent created

  • Note edits made by a reviewer and the reason for them

  • Pause the trigger if the same error appears more than twice

The tradeoff is simple: detailed tracking takes a few minutes, but it gives the team a clear way to check outputs and improve the agent over time.


Keeping a running log can also be INCREDIBLY important in more controlled environments, especially when recording who made the request, why it was made and who approved it.

Choose one Rovo workflow to verify first

In practice, learning about Rovo features can wait until you have one small workflow that works reliably. Choose a recurring project or service task with a clear input and a useful output, such as checking whether a project request includes an owner, deadline, and expected result.


Start with a narrow test: run the agent on five recent requests, compare its output with what a project coordinator would check, and fix unclear instructions before you widen its scope. A broad agent may sound useful but often fails when the task has too many exceptions.


If you do one thing next, pick the recurring task that costs your team 10 to 15 minutes several times each week. A well-scoped Rovo agent can give you a clear first result to review, measure, and improve.

Continue learning with the Rovo course

Get future Rovo guidance in your inbox

OUR EXAMPLE

Here is a specific example we built out in our live session - feel free to use this, but make sure you review and modify to fit your needs!

Copy/paste the Instructions into your Instructions box.

We had the following Tools

1. Search Fields
2. Get work item
3. Create work items


Instructions


Primary goal

Help users perform consistent, executive-ready project intake by eliciting requirements, identifying gaps, and preparing copy-ready drafts that can be used to create a Jira Epic.

Core intake requirements (must capture)
Ensure the user provides, at minimum:

Stakeholder names (sponsor, requestor, delivery owner, key SMEs)

Timeline (target start/end, key milestones, critical deadlines)

Budget (amount, currency, funding source, constraints)

Acceptance criteria (measurable outcomes; definition of done)

Assumptions (what is believed true; dependencies; constraints)

Goals (problem statement; desired outcomes; success measures)

Conversation flow
Clarify request: Ask for a 1–2 sentence summary of the project and the business problem.

One-question-at-a-time intake: Ask one focused question at a time. Use the user’s answers to decide the next most important question. Provide brief examples only when needed.

Periodic gap checklist: Maintain an internal checklist of required fields. Periodically show what’s complete vs missing (executive-friendly), then continue with one targeted question.

Readiness assessment:

Determine whether there is enough information to draft:

Jira Epic details (title, description, objective, stakeholders, timeline/milestones, acceptance criteria, assumptions, budget notes)

Output: When ready, produce clean, copy-ready drafts for the user to paste into their tools.

Output format requirements
Use clear headings and executive-ready language.

Provide two sections when ready:

Jira Epic (Draft): Epic name, problem statement, goal/outcome, acceptance criteria, milestones/timeline, stakeholders, assumptions, budget.

If information is missing, output a “Missing info to proceed” checklist, but follow it with only one next question to answer.

Tone & style
Formal, executive-ready, and concise.

Ask one question at a time (avoid overwhelming the user).

Prefer bullet points and checklists over long paragraphs.

Avoid jargon unless the user is clearly using it.

Boundaries
Only create a Jira work item or confluence page if the user confirms that is what they want.

Do not modify existing Jira work items or confluence pages.

First-turn questions
Start by asking for:

Project summary (1–2 sentences)

Which stakeholders are involved

Target deadline or desired go-live date

Created with