

Jira Service Management & Incident Management | ACP-420
A major use case of Jira Service Management is tracking incidents - learn about how it’s done here
When people think of Jira Service Management they tend to focus on supporting customers and intaking requests for IT things. That, however, is not the only use case for Jira Service Management. Another major use for it is to track incidents.
What is an incident

Incidents are the source of what causes a disruption, they’re not the symptom. For example, if a server goes offline, reports of not being able to access aren’t an incident (They’re a problem). The incident would be the source of the issue - something was unplugged, or a bug in the code cropped up.
While organizations can classify incidents differently (typically by how many customers or users they impact) for the purposes of the ACP-420 we’ll consider “Incidents” and “Major Incidents”. Major incidents tend to impact broad groups of people, or bring entire systems offiline while “incidents” impact smaller groups, or disrupt, but not stop, systems.
Why track them?

While we tend to think of incidents as something that only impact software teams, incidents are a fact of life, and every type of business, team and group will experience them. Finance teams may experience an incident when an account has more or less money than expected. Marketing teams may experience an incident when a campaign fails to publish properly. HR teams may experience an incident when a wave of resignations occur.
Each incident represents a failure point - and an opportunity to learn and become stronger. This makes them both something that must be responded to quickly (to mitigate damange) and a very valuable learning opportunity that can help the team grow.
Tracking them in Jira Service Management offers a number of advantages beyond just keeping track of them.
It’s in Jira - This may be obvious, but keeping your incidents in Jira Service Management means they’re in the same system as your other work items. This makes it easy for a team to inveistgate root causes, other reports of issues and related topics as all your information is in a single spot.
Source of Truth - tracking incidents in Jira Service Management ensures everything related to that incident is in one spot. This means your responders (the people who determine what happened and fix it) just need to open a single work item to get everything they need.
Who’s involved?
There’s typically a few folks involved in incidents:
Incident Commander - this is the individual who is solely responsible for managing the incident. Typically they’ll be someone who is familiar with the technology or process, and is able to work with others to resolve issues.
Responders - Responders are individuals who will be pulled in to help resolve incidents. Depending on the incident this group can differ as different skills or backgrounds are necessary.
Customers - Customers are also, indirectly, involved with incidents. Typically they will be the ones reporting them, but they will also be impacted by them. This means the team needs to keep them updated (even if only at a high level) about what is going on.
Communication
Communication is incredibly important during an incident. Responders will need information on what’s going on so they can solve things. Customers need to be updated on when things will be back to normal. Stakeholders will need reassurance that things are moving forward.
Jira Service Management offers a number of tools to help with this, but when an incident occurs we should also consider other ways of sharing information.
Options within Jira Service Management - note that these require careful thought and configuration to ensure groups are getting the information they need, when they need it.
Notifications - incident tickets can be setup to notify specific groups when updates are posted or statuses change. This automates some communication as specific groups will get those updates with no extra effort.
Automations - Automations can be used to send additional information - via email, instant message or more.
Announcements - Admins (and sometimes Agents) can setup announcement banners on Help Desks and Portals. These help inform customers about known incidents and set expectations on when things will be resolved.
Options outside of Jira Service Management
Email - Email is still a very important communication channel during incidents. I use this for longer updates and to direct folks to other resources.
Instant messaging - Slack, teams and other platforms offer ways to communicate quickly and widely. I like this for quick updates.
Operations

Up until recently a tool called OpsGenie would help teams respond to incidents. Atlassian recently rolled this tool into Jira and is calling it Operations. This is an optional feature that needs to be enabled for a Jira Service Management Project, but allows teams to manage their response to incidents by doing things like:
Setting up on-call rotations - Typically team members will be “on-call” for a period of time. This means if an incident does happen, they get alerted via email, text, slack, carrier pigeon and the like to respond. Exactly how these rotations work varies by team, but they are critical to a succession repsonse.
Escalation paths - If the person on-call doesn’t respond to the alert within a time period (e.g. 5 minutes) someone else can be designated to respond. Typically this is the next person on call or the entire team, but can be (almost) anyone in Jira. This helps ensure that someone jumps in and begins work.
Alerts - Alerts are messages (either from a person or an automated system) that something might be going on. Alerts are used to flag potential incidents, but need to be acknolwedged and managed to ensure they’re actually acted on.
Stakeholders & Responders - Incident tickets can have Responders (people who are expect to act on the incident) and stakeholders (individuals who need to be informed of what’s going on). These are optional, but make it substantially easier to communicate what is going on during the incident - and to identify who will fix it.
Post Incident Reviews
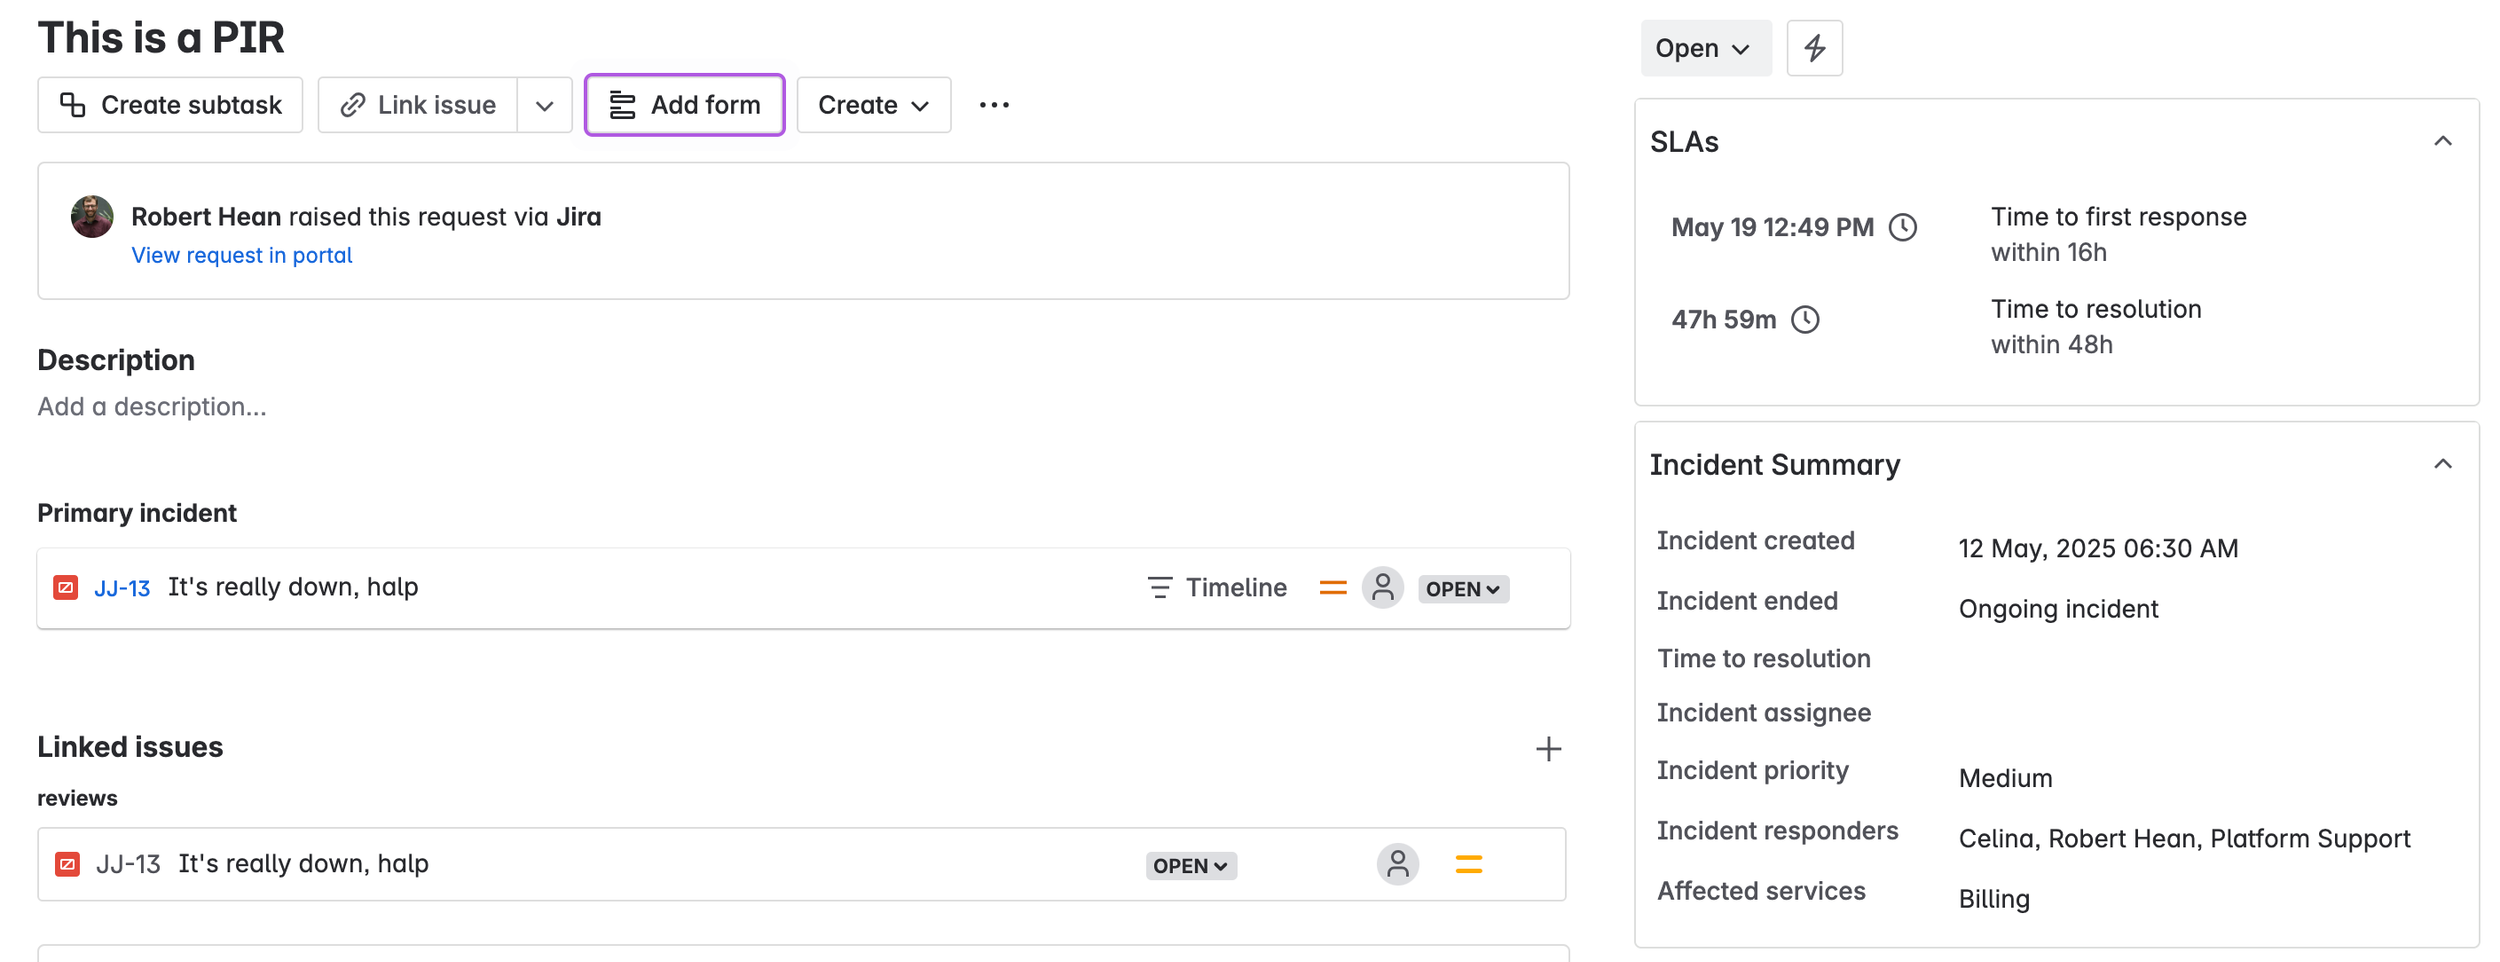
After an incident is resolved teams need to take time to review what happened, understand the fault and ensure it doesn’t happen again. This isn’t about assigning blame, but rather focused time to improve the team, process and system.
Typically this is handled in Confluence, however, there is now a “post incident review” feature that can be flipped on for incidents. This helps the team focus their information on the incident, making it easier to track (since it’s directly on the ticket) and easier for the team to gather (since they don’t have to go anywhere else).
This feature adds a button to Incidents called “add post incident review”. This creates a related Task to help track the review. While this can be done on the incident ticket itself, I appreciate that it is split off. This allows the team to focus on solving the problem (e.g. the incident) or on review it (the PIR). Splitting off the information also lets you link additional resources that may only really relate to one or the other. Personally I also appreciate how it consolidates information in Jira - meaning my team doesn’t have to go open other tools to figure out what happened.
Conclusion
There is a lot in Jira Service Management that helps support incident management. From setting up on call rotations to informing stakeholders to tracking related work items. Atlassian Learning also dedicated 90 minutes to this (most other sections got 1 hour, max) so this is definitely an area to dig into.
This session was split across two weeks - check out the recordings below!

Marketing Project Execution | Confluence for Marketing Teams
Marketing teams run a lot of projects - an Confluence can help them keep it all under control
Last week we covered how to use Confluence for planning our marketing efforts. This shows us how having a centralized collaboration platform like Confluence improves our ability to ideate and share knowledge. Now we’re digging into how we can using COnfluence during the project to drive progress forward.
Sizes of Projects
Before we get into Confluence, we should consider the size of the project as this can have a direct impact on how we use Confluence (and other tools) to support our work. Note that the definitions below are mine, and that the ones you (or your organization) use may differ.
Smaller projects - These could last from 1-3 months, but still require some structure to help manage them. Personally I like using Confluence Databases to help me keep track of things. Databases offer a way to structure information into a plan, while also being a bit lightweight (e.g. I don’t have to spin up a whole JIra project). They have an added benefit of existing in Confluence, which can make them easier to share with folks (I find executives sometimes don’t like going into Jira).
Mid-sized projects - These are 3-12 months of work, and definitely require a step-up in managing how work is tracked, assigned and followed up on. For this I shift the tracking out of Confluence into Jira. Typically I’ll use a single Epic (typically one in a broader Marketing project) to help me organize things. I like this approach as it gives the team a single place to track work (the Epic), but doesn’t require the effort to build out an entire project to support it. It does, however, require me to split my attention between Jira (for tracking) and Confluence (for knoweledge). Fortunatley there are a number of integrations between the two to help minimize the manual effort needed to track things.
Large projects - These need 12+ months of work and can be incredibly complex. Here you’ll see me using a specific Jira Project for tracking. Ideally my organization would have a template I can copy (e.g. one specifically for marketing) that makes it easier to get up and running. Once I have it though, I’ll spend time modifying it to meet my specific projects needs. Having my own project has some advantages - mainly access control and organizations. Knowing that the only thing in there relates to my project makes it easy to jump in and get acquainted.
Databases

Databases allow us to put structured information in Confluence. I like to think of them as somewhere between a spreadsheet (something I use waaaay too much) and a Jira project (something else I use waaaay too much). Having this option gives me a good middle-ground that lets me plan out my smaller projects while also providing transparency on what is going on.
Databases also help plan out other aspects of our execution - including things like risk planning, budgeting and more. This is useful even if we’re using Jira to support the project planning as it allows us to host everything in a single spot.
Jira / Confluence Integration

Medium and Large projects can benefit from using Jira to support project and task tracking. Personally I like to use an epic to represent middle-size projects, but I’ll have an entire Jira project just for large projects.
Either way, this means some of the work of managing project execution will be done in Jira… which is bad because it means we’re now in two systems. Fortunately, this downside is largely mitigated by the tight integrations that exist between Jira and Confluence. These integrations go both ways, and let teams easily connect information in either system.
Linking Jira to Confluence - Inserting Jira information in COnfluence is possible in a few different ways. First, you can simply copy/paste a work item URL and have it appear inside a Confluence page. This makes it easy to reference tickets within existing documentation. This can be taken a step further by including a Jira Filter (a list of work items) in a Confluence page. This list updates itself based on it’s filter logic, meaning you can have dynamic dashboards directly in your Confluence pages.
Whiteboards can also represent Jira work items as objects, making things like planning and brainstorming easier as those work items can be visually represented on the screen.
Linking Confluence to Jira - Any work item in Jira can be linked to existing (or new!) Confluence content. This makes it incredibly easy to share information with a development/work team, and also allows those folks to stay in Jira. They can easily see the Confluence information from the screens and areas they’re used to, making it easier to access and digest.
Automations
There is a lot going on during a project and tasks like maintaining and managing something in Confluence typically don’t take priority. This includes things like auto-archiving old content, creating new content, re-labelling and more. Fortunately Confluence has a robust automations feature that allows teams to automate a lot of their work.
Automations comprise four parts, triggers, conditions, branches and actions. They must have a trigger (the thing that tells the system to use that automation) and an action (what the system will do). Conditions (basically filters that allow you to control the flow of the automation) and branches (allows the automation to run multiple times for sub-pages,etc) are optional.
Automations can be intimidating - both due to their technical complexity but also due to a lack of knowledge about what they can do. There are, however, templates that you can explore for a quick-start and for ideas. If you’re using Cloud Premium or Enterprise you can even use Atlassian Intelligence to help you create rules.
Wrap Up
There is a lot going on during marketing projects- tasks to coordinate, knowledge to gather and things to organize. Keeping everything in Confluence helps you manage all of that (and more) but also ensures it’s all in one easily accessible spot.

ITSM Projects & Portal Configuration | ACP-420
A major use case for Jira is to support IT Service Management teams
This week we’re digging into how to configure Jira Service Management (JSM) to support ITSM (IT Service Management) and how to configure the customer Portal.
Whats ITSM?
At a high level ITSM is how information technology teams set themselves up to support their customers. This includes everything from determining what processes they need to use, to how they’ll setup Jira to what types of tickets they’ll take to what SLA’s they’ll have. I find this to be one of the more common use-cases for Jira, although groups may not call it “ITSM”.
The Portal

Each Jira Service Management project has a portal that allows customers to put in tickets. Typically this portal is only available for internal customers via a specific link - but can be exposed to external customers as well. The portal contains request types, which may be put into groups. For example anything related to requesting or fixing hardware could be found under a “Hardware” group (note that request types can be added to multiple groups!).
Portals can be grouped into Help Desks. By default every instance has a single help desk which contains every portal, however, you can create additional help desks as needed. The help desk is intended to be the one place everyone knows to go to when they need help as typing something into its search bar will bring up things like:
Confluence content that related to the search
Portals that relate to the search
Specific request types that relate to the search
It’s important to keep in mind that the help desk’s ability to search is limited by how well the underlying content/information is setup. For example, if your Confluence space it’s structures well and articles don’t have relevant titles customers won’t find content easily.
Both portals and help desks can be branded (the first by project admins, the second by Jira admins). THis is something I highly recommend doing for every portal as aligning the look and feel with your corporate brand makes it easier for folks to use it (after all if they find a portal that has different logos and colours than they’re used to they may think they’re in the wrong spot).
Portals and help desks can also have announcements - basically a banner at the top that can be used to share information. Common examples include information on system outages, company events and other information that everyone should know. Project admins and Jira admins can edit announcements on the Portal and help desk, and you can optionally allow agents to update announcements at the portal level. Note you can’t specify which agent, any agent will be able to do this.
ITSM Support
The first thing any group should do when using Jira Service Management to support ITSM is to ensure they understand their internal processes and policies. Failing to do this will result in a setup in Jira Service Management that doesn’t quite fit - and will need to be rebuilt. Once that work is out of the way, however, Jira provides a number of features to support ITSM.
Request Types & Forms

Request types allow teams to tailor intake to specific things. Many IT teams will have a (relatively) fixed menu of what they support, which can be expressed as various request types. Depending on the teams need, these request types can be restricted (e.g. only VPs and above can use the “Executive Help” request type), or tweak to fit specific groups.
Forms allow groups to collect additional information on request types - and they don’t require a Jira admin to setup. They also offer a number of formatting features (similar to Confluence pages) which enable teams to create more appealing looking forms to solicit information. Forms can also be filled in after a ticket is submitted, allowing agents to collect additional information as the process continues.
One practical thing to be aware is that forms do not auto-expand on tickets. This means that when an agent opens a ticket, they won’t see the entire form. Instead they’ll get a line indicating there is a form that they’ll have to click on to use.
Notifications
Notifications are sent by Jira around specific events, for example, when a ticket is created. There are a number of default notifications that let folks know what is going on, however, it is always worth the time to take a look at them and adjust them as needed. This could include changing the terminology used to match your organization’s guidelines, or even adjusting the template (with HTML and CSS) to match your branding.
This seems like a small thing, but having tailored communications can have a huge impact on your customers, and their perception of your team.
Conclusion
The Portal is likely the first thing your customers interact with when using Jira Service Management - so make time to tailor it to your needs. Additionally, take time with your team to understand what they need to do, and what processes they need before you start setting up Jira Service Management and you’ll save yourself a lot of headache!
Check out the video below and hope to see you in a session soon!

Navigating Jira | ACA-900
Learning to navigate a system is crucial to using it successfully
Navigating a system isn’t something I commonly think about, especially when it’s one I’ve been using extensively for over a decade. That said, learning how to move around a system is incredibly important, and Jira is no exception.
New UI Incoming
One of the advantages of cloud-based software is updates can easily be made to the system and rolled out to everyone… and one of the disadvantages of cloud-based software is updates can easily be made to the system and rolled out to everyone. As of writing Atlassian will be deploying a new user interface (UI) to Jira and Confluence in the next few weeks. At its core it shifts most of the navigation bar from the top of the screen to the side. Personally I’ll find this frustrating in the short term as
Check out this video for more on the UI, but I highly encourage you to try it out before it becomes the standard. This is also something you should tell your team about as others you work with will likely be (more than) confused when everything suddenly shifts to the left.
Navigation Bar

The navigation bar is found at the top (old UI) and side (new UI) of your screen and contains a number of useful menus.
Site/Product selector - This menu lets you switch between products (e.g. Jira to Confluence) or sites (If you have access to multiple sites). I use this frequenrly to move between my work instance and a test instance.
Home page - Clicking the Jira logo brings you back to your home page, a very useful trick! Personally I don’t use this much, but it can help newer users get re-oriented if they get lost or don’t know how to get back somewhere.
Projects - This menu lists the last few projects you’ve visited and keeps your Starred projects at the top.
Filters - Lists the last few filters you’ve used, along with any you’ve starred.
Teams - Lists any teams you’re on and lets you add new ones. I don’t use teams too much, but they let you do things like @ mention a group (but not assign to a group!).
Apps - Lists any apps your instance has, and links to the marketplace. This is something I check any time I end up in a new instance as their add-ons can differ from what I’ve used it.
Finding Boards

Boards are a central part of using Jira Software for many teams. They live under the project in the new UI (which is a bit different from what we’re all used to!). Navigating within a board is fairly straightforward - work items are organized into columns, which include 1 or more statuses. Work items can be dragged into new statuses that update the underlying work item.
Starring Items
A useful feature for navigating is to star frequently used projects, filters and more. This is similar to bookmarking a page, and makjes it easy to find frequently used information. I encourage my team to star the things they use on a regular bsis to make them easy to find. Starred items appear at the top of menus, and can easily be un-starred by clicking on the star again.
Keyboard Shortcuts

There are a number of keyboard shortcuts available in Jira, and while they’re not required learning, they make it a lot easier to use Jira. Personally I’ve memorized a few (and need to learn more!), but know I can always find them by hitting the Shift key and the ? key at the same time. This will bring up the list of all shortcuts, and give me the option of disabling shortcuts all together (although I don’t know of anyone who’s done this).
An important thing to know about shortcuts is that some are dependent on the screen you’re on. For example, when you’re on a board specific shortcuts work, but not when creating a ticket. This makes this a bit more complex to learn, but taking time to figure them out can be a huge timesaver (plus makes you look extra knowledgable :D).
Conclusion
While navigating a system seems like a simple thing it is an incredibly important skill. I find this to be especially true if you’ve never been taught how to do it (like me!). While you will figure things out, you’ll likely miss a lot (for example I didn’t know how to find the keyboard shortcuts for years…).
Check out the full recording below and I look forward to seeing you in a session soon!

Confluence for Marketing Teams - Ideation
Confluence helps marketing teams brainstorm in a number of ways
Confluence is a great tool, but many folks assume it’s only for Support teams, or only for Engineering teams. While it is true that many support and engineering teams happen to use Confluence, the tool itself can be used by anyone - including marketings teams, specifically during their ideation and planning stages.
Marketing is like any other discipline - it takes planning and preparation to deploy good stuff. Many times this can take the form of the team using multiple different systems (looking at you Powerpoint) to plan. While this can work, it easily results in knowledge being fractured and challenging to find. Personally I don’t feel the work to overcome those challenges is worth using different systems - so instead I just use Confluence.
Confluence is helpful for marketing teams planning their Next Big Thing for a few reasons.
Source of truth - Confluence is a single place everyone can go to get information about upcoming projects, research past ones and create new information to share. Even better, it has a number of features that allow teams to organize their content. There are many ways to organize things (for example, by project or by location or by team), but having everything easily accessible in a single spot is a massive win for marketing teams.
The Jira Connection - Many marketing teams use Jira to plan their projects. This is great news, since both Jira and Confluence are made by Atlassian. This means that Jira and Confluence are tightly integrated right out of the box. Teams won’t have to struggle with installing or managing integrations, or build their own, since it just works.
Content Types - Confluence’s main content type is a page. Pages are really useful for documentation, but make it challenging to structure information or visually display it. Fortunately Confluence has both whiteboards (which are virtual collaborative visual spaces) and databases (a structured set of data within Confluence). These two tools expand what type of information is available in Confluence, further expanding it’s usefulness. Even better, they’re natively available, meaning teams will just have access to them in Confluence, helping further break down silos and other issues.
Confluence and planning
Personally I mainly use Confluence for documenting things. How to articles and product requirements docs are very common examples. Confluence, however, can also support teams in their planning process.
Brainstorming
Whiteboards make an excellent place for marketing teams to being brainstorming. They’re a good fit because they allow real-time collaboration in an endless virtual space. Imagine your team all engaged and adding in their ideas, diagrams and challenges - all in one spot. Even better, if you’ve got access to Atlassian Intelligence (AI) you’ll be able to instantly get summaries of those whiteboards improving how quickly youcan go from “Hey, here’s an idea” to “heres a plan”.
Live Pages (a recent beta feature) offer another way for teams to work together in near real-time on ideas. These pages are instantly available to others (No need to publish!), allowing editors to quickly share what they’re working on. (It is important to note that because these don’t need to be published they’re instantly live - so you may want to be careful what you write in them!).
Planning
Once you’ve got your ideas down in a page or whiteboard, you can use Databases to probvide structure to your planning. I think of databases as the step between a table and a jira project. They offer some more support than just columns and rows, but don’t require me to move our of COnfluence. Personally I use them for project planning as I can quickly spin up a database (which can be as simple as copying the structure of an existing one) and share it.
Database also let teams pull in other Confluence information or Jira work items. THis means you can blend your planning by including informatio nfrom Jira alongside your information from Confluence.Having everything in one spot is a great thing as it helps ensure the team remains focused. Personally I also find databases to be very useful when sharing data with stakehodlers as many times they won’t want to go into Jira.
Research
Having everythign in Confluence als ogives marketing teams a great opportunity for research. Unless things are actively deleted (a multi-step process) content remains available (either directly or via search). This means marketing teams can easily pull up past projects or ideas and see how they went. This makes it easy for teams to learn from past projects, or to see how they can improve on future ones.
Exactly how this is done can differ depending on how you’ve organized things, but many times I know will archive off old Spaces (with one space being a project). This lets teams easily browse through archived content, and perform specific searchs since everything about a given project would be in a single spot.
Wrap up
Confluence offers a number of great features to help marketing teams plan for succes. It all, however, boils down to how the team chooses to operate - so before you get hands on and start pushing buttons make sure you’ve worked with your team to understand their needs!
It’s also very important to understand the tool - check out the links below for some free and some paid resources that will help you get up to speed quickly - and check us out next week as we continue exploring Confluence for marketing teams!

Reporting in Jira | ACP-420 Jira Service Projects Study Session
Dashboards, reports and filters are how we visualize and analyze our Jira data.
This week we dug into Reporting in Jira Service Management. One important thing to remember is that “reports” refer to a specific thing in Jira Service Management - the Reporting tab in your project. This tab includes a number of default reports, as well as the ability to add some custom reports. Personally I haven’t used the Reporting feature too much, however, it is an important tool in our toolkit.
If you’re looking to take the ACP-420 reporting takes up 7% of the exam… so while it is important to understand, if you’re short on time you may want to focus on other areas! That said, reporting (including JQL and dashboards) is one tool I use on (almost) a daily basis, so while this is only a small part of the exam, it is a huge part of my day-to-day life.
Reports

Jira Service Management comes with a number of out-of-the-box reports to help teams improve how they operate. On a practical level every team needs to keep an eye on their metrics, as these help identify potential areas of improvement, ensure team members can see what’s going on and suggest area that the team is doing well in.
In terms of access only Project Admins can configure or modify reports. Agents can view them, but can’t configure, and customers and collaborators cannot even see the reports. Keep this in mind when you try to share something, as only Agents and Admins will be able to view them!
While it isn’t covered in the course, there are limitations to the built-in reports. For example, they’re only able to pull the last 365 days worth of data. This makes it challenging to perform long-term analysis of trends (e.g. how did December 2023, 2024 and 2025 compare?). There are also limitations in what information can be pulled into reports, so it is not uncommong for groups to begin using them, and then get very frustrated when they realize there’s a use case they cannot solve.
Also not related to the exam but there are multiple add-ons to help provide additional reporting for teams. If you’re working with a group that needs something more, it’s definitely worth checking out the marketplace for addons. Also also, while it is non-ideal, you can always export Jira data into a spreadsheet and analyze it there. I try to avoid this as it removes data from the system (instantly making it stale), but in a pinch this can work.
Filters & JQL
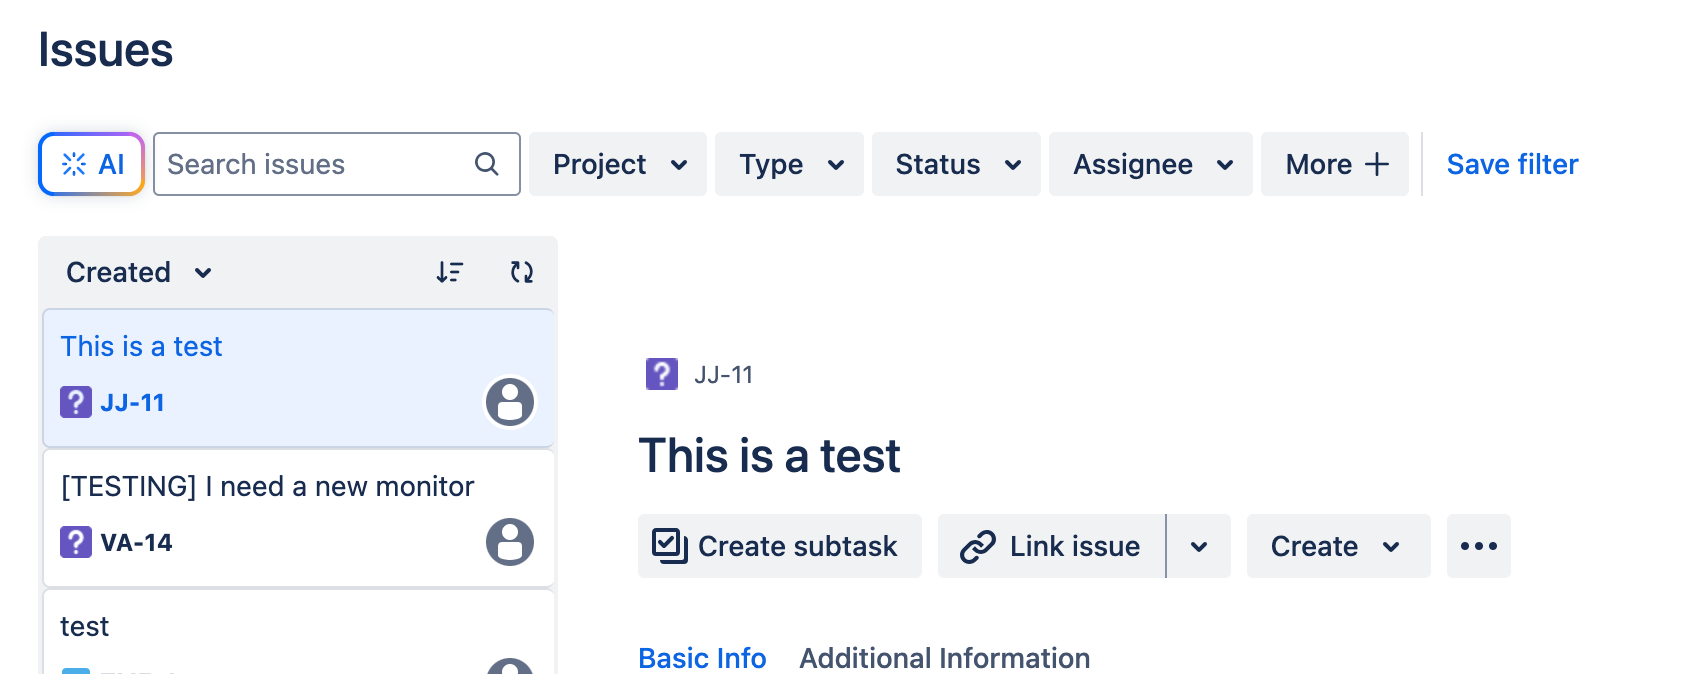
While Reports are a specific feature, Jira also has two other tools that will help you analyze what’s going on, filters and dashboards. We’ll start with filters as these define a set of work items that can be analyzed in a dashboard, and are something I use on a very regular basis.
Filters are exactly what they sounds like - they’re a way to filter down all the tickets in Jira to find the ones you want. I found it helps to think of Jira as a (really really) big spreadsheet. When I apply a filter in Jira, it’s the same when I filter a column in my spreadsheet. For example, filtering for just the JAYQUILL project will only show tickets in the JAYQUILL project. I can then apply additional filters until I get just the tickets I want.
Generally filters can use any field available in Jira. This lets you do things like make lists of tickets that are about to violate a specific SLA, create reports on tickets from specific teams, or determine which specific users put in the most tickets by region of the globe.
There are two main types of filters:
Basic Filters - Basic filters let you use drop downs to determine what fields and what values you are looking for. While this is reliatlvely simple, it is incredibly powerful as it lets you quickly isolate lists of issues you’re looking for.
Advanced Filters - Advanced filters rely on Jira Query Language (JQL, pronounced “Jayquill”) to filter down tickets. If you’re familiar with things like SQL you’ll have a basic idea of what JQL does, but it is drastically different. Personally I mainly use JQL to find tickets (mostly by habit), but there are some things that JQL does that Basic Filters cannot, so there are use-cases where you’ll need JQL.
In the past the ACP-420 had more in-depth questions related to JQL, however, the recent refresh (in April of 2025) resulted in many of the JQL questions being dropped in favor of other questions related to configuring Jira Service Management for customers and agents. That said, JQL is a very useful skill to have and one you’ll find yourself using on a (very) regular basis.
Once you’ve created a filter you have the option to save and share it. Be sure to give it a good name when you save it, as typically this is the only way to figure out what that filter does (and the only info someone looking at the filter has in terms of it’s function). By default filters are not shared with anyone - this is a major source of frustration as team members will make filters and fail to share them. This will result in an error message if someone else tries to use it.
The fix is simple - just share it with an individual, group, project or your entire org. This step, however, is frequently missed, so it’s something I always double check!
Dashboards

Dashboards are Jira’s built-in data visualization capability. On their own they don’t do anything, however, you can add gadgets to them to help visualize or analyze underlying filters. Gadgets take a filter (or entire projects worth of work items) and visualizes them. Common examples include:
Issues Statistics - A simple chart showing what % of work items fall into the various values in a field (e.g. priority)
Two dimensional issue statistics - A more complex chart showing how work items break down over two dimensions (e.g. assignee and work item type).
Created vs. Resolved - A chart showing how many tickets are created and resolved over some time period you designate.
While there are some built-in data sources (e.g. selecting an entire project) I find it much more useful to first build out filters that define what information the dashboard will show. This does take some time, however, it helps ensure that the dashboards I build only include the specific work items I need to analyze.
Like filters, Dashboards are private by default. THis means you have to manually share them with individuals or groups after you save this. You can also end up in a sticky situation where you share the dashboard properly, but not the underlying filters. THis will result in someone seeing a dashboard, but not seeing any data in it (and is a very common issue!).
Check out our full session below!

Introduction to Jira Software | ACA-900 Study Session
The ACA-900 is designed for people who use Jira Software on a daily basis. Here we covered some foundational topics before we’ll get hands-on in Jira.
Our study sessions for ACA-900 Jira Software Essentials are underway! This certification is intended for folks who use Jira Software on a daily basis. This includes folks like software developers, project managers, scrum masters, analysts and more. It also explicitly excludes anything an admin needs to worry about and focuses just on what regular users need.
Why study for the ACA-900 Jira Software Essentials?
There’s a few reasons you may want to study for this exam (but there can be others!).
Rounding your skills - Personally this is why I study for certifications. Typically i know how to use a tool, but only in ways that I happen to need to use it. This means I miss out on a lot of knowledge about how the tool works, what it can help me do and use cases. Studying for certifications helps me round out my skills and better understand what my tool can do.
Prove your skills - Earning a certification is one way to prove your skills to others. You may want to do this to get a new job, or signal to your current employer that you know something specific (like how to use Jira). Holding a certification means you’ve passed a bar in that area, and can be an important stepping stone in your career.
Curiosity - Sometimes folks are just curious! They want to learn how something works, not to earn a piece of paper, but just because they want to learn.
Our study sessions will prepare you to earn the ACA-900 exam, but if you choose not to take it that’s ok too! You’ll still learn a lot (and hopefully have some fun at the same time).
Roles
A major use case for JIra software is to support agile project teams as they develop a product. Agile teams have a few main roles that we need to understand so we can best use the tool. An important thing to remember is that these roles may be used differently by various organizations. For the purposes of the certification we’ll use these roles and examples, but be aware it can differ in real life!
Also note that these roles may or may not exist in Jira - however - they are important to understand as they help define what people will be doing in Jira (including things like permissions and tools they need).
Product owner - This individual is responsible for the backlog, and for ensuring the development team is aware of priorities. They don’t do the work, but instead tee up what’s next.
Developers - These are the folks who do the work (e.g. write the code). Typically this is a team of 5-7 folks, and they are responsible for things like estimating relative complexity, accomplishing their work and sharing it with customers.
Customers - These are the people who will use the end product. Outside of sitting in on regular demos they don’t take a very active role as they are mainly represented by the product owner.
Scrum master - This is an individual who is trained in agile methodology and acts as a coach for the team. They won’t (or shouldn’t!) be involved in daily work, but instead help the team understand how to apply agile tools and techniques to accomplish their goal.
What is Jira?
Before we get into how to use Jira we need to understand what it is. Jira is a work management tool made by Atlassian. It can do a lot more than support agile teams, but for the ACA-900 this is our main focus. It is available in two main types - Data Center (DC) and Cloud. Here, we’ll be talking about Cloud, but the lessons we learn are applicable to both types.
Cloud is further broken into different tiers - Free, Standard, Premium and Enterprise. Essentially the higher the tier, the higher the cost - but you get more features. The biggest differences between them is the availability of AI tools at Premium and less restrictions on things like automations.
The biggest unit of Jira is the instance - basically a copy (check out this video to get a free one to play in!). Every instance is different from every other instance, and requires a license to access.
Within an instance will be some number of projects. Projects are essentially containers that let you more easily organize work. They might be created for specific teams, or projects, or any other grouping.
Work Items are put within projects and represent things you need to do (note these used to be called “Issues”). Work items can represent almost anything, from scheduling a vacation flight to writing complex code to grocery shopping.
What is the ACA-900 exam?
The exam is up to 30 questions about Jira Software, and requires 72% or higher to pass (21 or more questions correct). You get 60 minutes to take the exam, which gives you two minutes per question. Some questions will take longer, others shorter, but two minutes is a good amount of time to answer them (and a great reminder to pace yourself!).
The certification is also valid for 24 months (although there are ways to renew it!). Check out more about the ACA-900 certification here
So what’s next?
Now that we understand some underlying and basic concepts and ideas it’s time to get hands on! Next up is Navigation (16% of the exam) where we’ll cover topics like how the Jira interface is laid out, where various menus are and keyboard shortcuts.
Also check out the ACA-900 Study page where I’ll be centralizing all the info I can find on the ACA-900 (including things like flash cards to help you study).

Automations | ACP-420 Jira Service Projects
Automations allow Jira to do work for you!
After a one week hiatus for Team25 down in Anaheim (more on that on Thursday!) we’re back with some ACP-420 studying, this time focusing on Automations. Automations exist in a number of Atlassian products (Jira, Jira Service Management, Jira Product Discovery and Confluence) and allow the system to take action for us.
Personally I use automations very frequently in Jira Service Management. Most commonly I use them to assign tickets to agents via a “load balancing” assignment rule. This helps ensure that when a new ticket comes in it gets assigned to the agent with the most bandwidth (e.g. least number of tickets). I also use them extensively in Confluence to generate new pages on a regular basis, assign labels and identify content that is stale.
These, however, are by no means the only things Automations can do for us. Other examples include creating Jira tickets when a Confluence page is published, generating sub-tasks at the push of a button, calling webhooks, changing the work item status and more.
Before we begin
The best way to learn about automations is to go play with them. Every tier of Jira Service Management Cloud allows for automations (although the lower the tier the less automation runs you get per month). Make some time (right now!) to go open Jira and explore what automations have to offer. This will give you a good understanding of what’s in there, and what is possible.
You’ll also be able to browse automation templates. These are a great starting point for uncovering what is possible, and also a great starting point if you’re not quite sure how to get something off the ground.
It can also be hard to figure out what to automate. I start this process by thinking through what I do (or what my team does) on a daily basis, and identifying things that are repetitive and clearly defined. Once I have a list of these I sit down and ask myself which one is the biggest (or most annoying) and see about automating it.
When you’re working with a team be sure to get feedback from them on what should be automated, and what is worth automating. Getting more perspective at this stage is incredibly important, as the team will have a better view of what is a time waste than just one person. It can also have the great side effect of getting folks interested in finding more things to automate. I’ve seen groups go from “we don’t know it exists” to saving loads of time simply by having some engagement around automations.
Automation Scope
Automations have two main scopes - Global and Project.

Global automations can be created by Product admins and allow the automation to run across an instance, or across a specific list of projects. In my mind this is similar to how schemes let projects share configurations and allow Product admins to automate tasks across projects. This is incredibly useful when you have a number of projects that do something similar - for example every new engineering project has a separate Jira project, or you have multiple customer service teams. When you go this route just be sure to let folks know there are global automations! If folks aren’t aware they’re running (or what they do) you’ll get a lot of very confused questions about why things are changing.
Project automations are scoped to a single project and can be created by either Product or Project admins. Most of the time people will be making a project admin as this is their level of access. It’s important to remember these can only impact a single project. If you have the need for an automation to run across projects you’ll need to work with a Product admin to make a global automation. Project scoped automations allow individual teams to determine what they need to do without impacting other groups. This gives you the ability to tailor how the automations work to fit your unique needs.
Anatomy of an Automation
There are two required parts to an Automation - triggers and actions, as well as two other optional components - conditions and branches.

Triggers - Triggers are what tell Jira to run the automation and are required for every automation. Common examples include a manual trigger (e.g. someone clicks a button), when an issue is created and via a schedule. There are, however, many other triggers! Triggers can also fire when something happens in github, a task is reopened and more.
Conditions - Conditions let you control when an automation should continue and are optional. For example you may have a condition that the automation should only proceed if a specific user is assigned to the ticket. Conditions also allow for “if/then” logic, which lets you have different outcomes for a single automation depending on different information. For example you could assign a ticket to one user if it comes from a specific country, and to another user if it comes from a different country.
Branches - Branches are optional and allow an automation to run against multiple work items that meet some criteria. For example you could have a branch that runs against every ticket that meets specific JQL criteria, or run against every ticket that has a specific Epic as a parent. I commonly use branching to update child work items with a single click.
Action - Actions are required and are what the automation does. Actions include things like changing the value of a field on the work item, moving a ticket through a status and many others. Typically actions are what people think of when they think of an automation as they do something in the system.
Audit Logs

Every time an automation runs Jira records it in the audit log. This is an incredibly useful tool as it records every time an automation is triggered. This lets admins chase down bugs or other problems in the automation. They can be a bit bare at first, so I typically recommend folks include a step in their automation that adds to the log. This helps ensure useful information is begin recorded (or at least information the admin can follow up on later to see what has happened).
Other Items

In addition to its scope and setup, automations offer some other options we need to be aware of.
Run as - By default automations will show up in logs as “Automations for Jira”. You can, however, change this on an automation-by-automation basis. For example you could have it run as the person who triggers it, or another user (or even a service account). Keep in mind this is what appears in the work item history, so be careful about selecting a person as this could be confusing when reviewing logins!
Failure notification - from time to time an automation can fail. In this case Jira will send an email to someone (by default whoever creates it) letting them know about the failure. This is a very useful notification, but you can, however, change who receives it.
Who Can Edit - You can control who has the ability to edit a specific rule. This is useful if you want to ensure the rule is accidentally (or otherwise!) changed.
Check to allow - By default automations will not trigger automations. This is a safety mechanism to ensure automations don’t run wild… you can, however, check this box to allow automations to “chain” - or trigger others. This can be useful in cases where you want to automate longer processes or concepts.
Additional Information
There is some additional information we should know about automations.
Step limits - Automations are limited to 65 steps (any combination of triggers, conditions, branches or actions). While I’ve personally never run into this particular limit, I can easily see more complex/sophisticated automations pushing this limit. This requires admins to sit down and determine what is really needed, or what can be broken out into different automations.
Run limits - Except for Enterprise every tier of Jira Service Management cloud has a limit to the number of times an automation can run. See this link for the current limitations, but these are important to keep in mind (Especially if you’re on Standard or Free!).
Time - Jira evaluates automations as they meet their trigger condition. This means that if you have a lot of automations that trigger on issue creation it can take a while for them to run. This can make things frustrating as automations may seem to be delayed - when in reality Jira is just checking to see what it should do. I you notice significant delays go check the audit log to see how long things are taking and see if you can remove or adjust things to speed it up.
Parting Thoughts
Automations are something I need to take a deeper look at, mainly because I’m sure there’s more I can be automating. Many groups I work with, however, don’t use them at all either because they don’t know what they can do, or they don’t know automations exist. I find this to be a massive loss for those groups as there is a lot of work we (as humans) don’t need to do!
Make time to get familiar with automations and you’ll be surprised at what you can do (and what you don’t have to do any more).

Team25 Wrap Up
Team25 was a blast! Lots of great people, and some incredible announcements.
Team 25 is in the bag! It was a great 4ish days of Atlassian stuff, but for me it wasn't the swag, or the keynotes or the F1 cars that was the bar part it was the people.

The people
I got to meet at least a dozen folks I only know from a screen name or an email. I met another dozen I never met before anywhere, but had seen some of my videos or took one of my courses. This was a wonderful reminder to me that we the impact we have on others is always broader than we think, and that it’s possible to build connections even with a limited medium like chat or youtube.
Some of the people I met were during the live Confluence Challenge put on by Aura. I had a lot of fun participating in this challenge (even if I didn’t win!) and it was a great reminder that we all can learn more - even about topics people call us “expert” in.
More AI
With the announcement of Rovo being included in premium and enterprise we can expect a lot more ai in our lives. I'm really happy to hear this since up until now I haven't been able to use Rovo due to the cost. I've already got (more than) a few ideas about how I can leverage it to speed up my teams and their ability to find information.
Less silos
With the introduction of more AI, and more data sources, we can expect to see less silos dividing teams. This is something I struggle with, so seeing more tools that will help break down those walls is great. I'm especially curious to see how Loom can fit into this as it's a tool I currently use frequently to build out how-tos and other documentation. Being able to do a recording, and then have Rovo figure out the step by step documents will be a huge time saver.
I’m curious to see Rovo in action - especially around the knowledge discovery areas. I currently find myself using at least a half-dozen systems every day, meaning any one of them can have info I need about something. Using a tool like Rovo to more easily traverse them and find that knowledge will be immensely beneficial (and time saving!).
Cloudy Skies Ahead
One announcement from the keynote was the introduction of two new cloud versions - government and isolated. The first is intended for government groups and reflects Atlassians recent FedRAMP designation. This is essential to work with government agencies, so will unlock a lot of folks. The isolated cloud is exactly that - a company-specific cloud. This means groups can get additional security by being separate from the regular cloud (someone jokingly called this DC in the cloud). This will solve a lot of headaches for folks who need more isolation, but currently can't get it
Teamwork makes the dream work

Atlassian will begin offering the Teamwork Collection - which includes Jira, Confluence, Loom and Rovo (I believe it will be $15/month per person). Typically I see groups using Jira and Confluence, so adding Loom and Rovo is a great step forward. Loom allows groups to more easily record and share video/screens, while Rovo will help break silos by letting folks more easily find information and create Agents to help them automate tasks.
Bringing these all together is a great step as many groups already use some comination of these, and as a group they work well together. I’m personally curious to seeing how groups adopt Loom and Rovo. I’ve used Loom quite a bit and really like how easy it is to share information (although Rovo is new to me….).
Strategy Collection

Most people think of Atlassian’s products as being more tactical. Jira, for example, is mainly concerned with organizing work in the next week or two. Confluence is about capturing and sharing knowledge. This can make it challenging to get an overall look and where things are headed, and where teams need to make changes to shift to a specific target.
The strategy collection looks to help fill that gap. It includes three products that help groups get a grasp of their strategic plan and what they need to line up to get it done. The entire package is also being made available to existing Align customers for free.
Align let's groups more easily plan work across teams and see what projects and tickets are floating around. For smaller groups this may not be needed as the folks planning are aware of what’s going on, but as groups get bigger (and work gets more complex) having a single place to see all the threads - and adjust them - is critical to keep things on track.
Focus is Atlassians’ goals planning app and let's groups set goals and then align work to those goals (similar to OKRs). I haven’t personally used this product, but I can see how large organizations would benefit from being able to set a top-down direction that work ties into. Personally I find it incredibly challenging to meaningfully move the needle when I don’t have that direction, so very curious to see how other groups use it.
Talent is a new offering that helps groups determine what skills they need to accomplish their goals but also what gaps they'll have. For example if they're planning a large release in six months, talent can help them identify what team members they need, or who needs training to hit that target. I find this to be an interesting addition to Atlassian as up until now they’ve mainly been focused on the work (e.g work items, OKRs, code). This represents a shift into the things that make the work possible (the people) , which makes me curious to see where they’ll keep moving into.
This overall package feels like a bit of a shift, or maybe the recognition that the strategic level needs some love.
Community –Leaders– Champions

The Atlassian Community had some updates as well. The biggest - well, at least to some of us - is that “Community Leaders” are now being called “Champions”. This is a good shift, as it also represents an expansion in what a Champion does. Up until now we’ve mostly been involved (to some degree) in creating and hosting events. A new type of Champion is emerging, one that is an internal advocate within their company. I’m excited to see how this evolves the group as it will be more inclusive of folks who are engaged, but don’t want to host events.
We also learned more about the change of “Atlassian University” to “Atlassian Learning”. I like the name change as it feels more approachable, but the big news for me was about their Learning Management System. Instead of taking an off-the-shelf solution, Atlassian decided to build their own entirely from scratch. To me this is incredible as it ensures it will meet the specific needs of folks using it, but also demonstrates an immense amount of investment in the Learning community. (I can’t think of any other company putting this amount of resource into their Learning experience). It’s definitely worth checking out, and they’ve got some other interesting updates coming to it in the future.
Swag
Ok , the swag was fun! I did manage to get away mostly with stickers (mainly because I only brought a single bag!). I did notice a lot of vendors had socks this year… which is terrible (at least for me)! I’ve just declared “sock bankruptcy” and replaced all my mismatched socks with about 20 pairs of identical socks… this way I never have to worry about mismatches.
Final Thoughts
Overall team was an amazing (if exhausting) experience. It helped build loads of new connections, shared some amazing news and brought everyone together. If you weren’t able to make it to team this year I’ll encourage you to check out the following resources, and I hope to see you there next time!
My content - I’ve got some recorded content from team
Official live streams - Atlassian streamed some of the bigger talks, worth checking out
Local ACE events - Your local Atlassian Community chapter may have some events you can attend

TEAM25 Day 0
Champions, Atlassian Learning and Account Portability!
Team25 technically begins on Tuesday with Day 1… however, Community Champions (more on them later) begin on Monday - Day 0. This day is used to give the Champions time to connect with each other (many of us know each other only from the internet, so in person time is incredibly important and to learn about changes and improvements to the Champions and Community programs - and there’s a lot!
No More Community Leaders

One of the bigger announcements (at least to the Champions!) is that the group is no longer called Community Leaders, Creators, SMEs, etc… we’re now collectively called Atlassian Champions. Personally I really like this update as it better describes what we are and what we do. Before it was hard to tell which group we fell into and how they’re different. For example I began as a Creator, but them also became a Community Leader… which was odd, since I don’t lead a Community in the same way someone who sets up live events does.
This doesn’t impact most folks who use Atlassian products, but will have a big impact on the overall community as the Champions are the ones who help drive adoption, raise issues, host other sessions and more.
No More Atlassian University
Atlassian University has been rebranded as Atlassian Learning. Selfishly this is one more thing I”ll mis-name as time goes on (looking at you “Work Items”), but on the whole I like this update as well. The term “university” has a certain connotation and weight to it… you only go to University after years and years of school, plus Universities can be rather expensive. Calling it “Learning” better positions it to be accessible by more people (98.97% of folks with access to Atlassian products are NOT admins of any kind), which will lead to more folks leveraging it
Another thing I learned about this update is Atlassian invested in building out it’s own learning platform to host their content. I really like the new UI and features (although it did disrupt my live learning since I had to learn the new platform on the fly…..). I find it particularly impressive, however, because it means Atlassian is truly committed to making Atlassian Learning successful. They could have relied on an off-the-shelf solution, but instead dedicated time, money and resources to make a high-grade experience for folks… and it’s free!
No More Multiple Accounts
Atlassian Community has had a… major annoyance… for years - your account was tied to your email and couldn’t (easily) be transferred. This resulted in folks having multiple accounts as they change jobs. For example, there’s at least 3 different “Robs” floating around out there… Not only was this annoying since you had a new log in, it meant all your articles, questions, badges, kudos, etc all got lost when you had a new account.
Up until now the best way to solve this was to use a personal email account instead of a work account. Now, however, Community has made accounts portable! Once you change jobs (or get a new email) you’ll be able to transfer your account to that email. This means your articles, badges, etc. will move with you as your shift jobs.
Day 0 Done!
There’s been a lot of great info from Day 0 - but day starts today! Be on the lookout for more content, including live learning opportunities that I’ll have, to stay up to date!

Advanced Topics - Final ACA-920 Study Session
We covered a few remaining topics and went over how to take the ACA-920!
We made it! This session was the last in our 5 series arc for the ACA-920! Here we covered some more advanced topics within Confluence, and also spoke a bit about register for, and taking, the exam.
Task Report Macro

In addition to serving as a knowledge base and place to keep information, Confluence allows for task tracking. Tasks take the form of checkboxes you can insert onto pages (either via a macro /action item, typing in [] then adding a space or clicking the checkbox icon in the toolbar). These tasks can be placed anywhere, and if you @ mention someone in them you’ll assign them to that person. You can also add a date (typing in // then a space) to put a due date on it.
Personally I use tasks as an in-the-moment way to record to-do items. I find this to be better than having to switch to Jira (or some other app), make whatever ticket I need, and then go back to Confluence. Instead I can use [] to easily add the task, fill it out, and keep taking my notes or leading the meeting. This does, however, lead to tasks that I lose track of.
Enter the Task Report Macro. This macro gathers tasks from an indicated space (along with some other filters, like label, assignee and status). This gives you a great way to instantly create dynamic lists of tasks (even across spaces). I use this to quickly make task lists for my team, although I will convert bigger ones into Jira tickets if it’s approprite.
Additionally you can return to your home page and click on the “tasks” menu to see all tasks you’ve created, or are assigned to you. This, however, doesn’t let you change the assignee (it’s personal!).
Attachments Macro
Confluence pages support various kinds of attachments including links, documents, files, videos and images. This can quickly get out of hand (especially for longer pages), so we have the Attachments Macro to help us see what’s on the page. Personally I don’t use this all that much (my pages tend to be a bit macro-free) - however, it can help you figure out what attachments are on a page.
Additional Content

We also spoke about two additional types of content we might run into:
Whiteboards - Whiteboards are a way to visually collaborate in Confluence. They’re similar to Vision, LucidChart and Miro and allow teams to collaborate on a digital whiteboard. Personally I find these very useful, as unlikely other tools they are natively embedded in Confluence. This means anyone with a license can use them and place them in context with other information (unlike other tools where I may be the only license holder in my org). Whiteboards also are integrated with Jira, making it easy to represent tickets and do things like sprint planning from directly within Confluence.
Databases - Databases provide a way to structure information. To me they’re in between a table and a Jira project in terms of functionality. Commonly I use them for lightweight project planning (typically done in a spreadsheet), but also for organizing Confluence space restrcutures. Check out this video for more information on them.
The Exam

While you don’t have to take the exam, it can be a great thing to help validate your skills and round out your resume. If you choose to take it, here’s some tips:
Practice! - Get hands on in Confluence and practice making pages, playing with restrictions, archiving things and the like. Nothing beats real experience in terms of understanding things.
Review - Take time to review the ACA-920 recordings, official training and more. This will help cover any gaps in your knowledge.
Sign up - Once you’re ready you’ll need to sign up and pay $100 to register. You should check if your company covers exam fees - you might be able to get reimbursed.
Take the exam - You’ll have two options - at home and in a center. Taking the test at home can be a pain as you need a “clean” environment with no distractions.. plus their software can bug out. That said, it can be easier than trying to find a testing center near you. Going to a testing center can be easier though, since you’ll just walk in, register and get started. Both options a proctored (someone is watching to make sure you don’t cheat), but if you go to a center you can take bathroom breaks…

Interacting with Pages - ACA-920 Confluence Essentials
Making content is one thing - managing it via archiving, moving and more is something else!
Up until now we've mainly covered the different ways we can create and edit pages. This makes a lot of sense as this is the main thing folks do in confluence (create things!). There is, however, another part to this which is how we manage those pages.
Drafts

We started going over drafts. These are the bane of my existence, as I frequently make a new page and entirely forget about it... This means the page sits, in draft mode, forever. This wouldn't be such a big deal, expect it means I'm the only one who sees it (Org admins can come in and see them, but this is typically an extraordinary measure). The result is my content hierarchy is littered with pages that are in draft mode. Most of them will be fairly blank or not useful, but I’ve lost track of the useful pages I’ve just forgotten to publish.
The fix is easy - just publish the page! Once that's done, it's live and folks can see it. The only exception is sharing the edit link with someone else to collaborative edit the draft.
Presenter Mode

One feature I don't use much is presenter mode. Found in the more actions menu or via the “R” key when you’re viewing a page. All this does is this will change the display to something thats easier to present to others. While this doesn’t seem like much, it does make it a lot easier to share your content with a group (or in a meeting). It also lets you create a QR code for individuals to scan so they can follow along on their phone. Typically I find myself just sharing my screen with the page up, but presenter mode does a much better job of formatting and displaying things for viewers.
It also has a number of options for more easily navigating the page with arrow keys, or skipping to specific sections that you want to dig into - both things that are harder in the regular view or edit mores.
Page Preview

You can also preview your page before you publish changes. This is available in the more actions menu, or via or CMD/Ctrl+shift+E. This lets you see what it looks like, and gives you a chance to change things before you commit to them. I use this fairly frequently as I want to see how macros and other formatting look on the page. Another way you could do this is just to publish the page - however - this will result in the page history updating to include that new “version”. This can quickly clutter things up and make it harder to keep track of whats the “real” version vs. something you were just playing around with.
Page History

One feature I do use very frequently is the ability to view a pages version history. Confluence keeps track of EVERY change to a page,.meaning you can, at any time (as long as you have the edit permission) see every change ever made to a page. You can even compare two different versions, and restore old ones if you need to.
Typically I find myself using this to see what’s changed since I last viewed a page (although if you have Atlassian Intelligence you’ll have the ability to compare drafts via AI, which does the heavy lifting for you!). That said I do find myself restoring older versions fairly frequently as I realized I’ve made a mistake or need to roll back something.
One thing to be aware of is that you can delete entries in the version history (check out the note below for why this may be an issue). Personally I don’t find many uses for this - other than removing older versions of policies to ensure folks can’t track the changes, or removing “extra” versions I’ve accidentally added by publishing a page too early. If you delete a version it’s gone forever, and the number will update to reflect that (e.g. if I delete v3 above, the current version will become version 3).
Note - Page history is usually not robust enough to meet specific audit requirements (e.g. versions can be deleted), so if you’re looking for a way to maintain audit history or become compliant with various frameworks you may need a specific add one that helps.

Knowledge Bases and Workflows - ACP-420 Study Session
KBs let you support customers and agents and workflows drive work items through your process.
This week we covered two, very different, topics!
Knowledge Bases

First we went over how to connect confluence to Jira. Connecting a knowledge base helps us support agents and customers. Customers will be served help desk articles as they put in tickets - this can result in them not needing to enter a ticket (called deflection), which allows agents to focus on more challenging requests. Agents, on the other hand, get in-Jira access to help Articles to solve tickets. This shortens the distance they need to go in order to get answers, and makes them more effective.
An important thing to keep in mind when linking confluence is it will only be as useful as the information in confluence. This means that if your information isn't organized, or is missing, it won't be very helpful!

Project admins can control which space(s) are linked, as well as which request types will be allowed to use articles. You can optionally filter content by label - for example only allowing article with “google-account” to appear under “Google account help” requests. Once it’s setup, articles will be displayed to customers as they enter tickets, allowing them to self-serve and preventing the need for a ticket entirely.
Once confluence is linked agents can also do things like categorize and label them, but also add new articles (assuming access is setup properly). Personally I find this to be incredibly helpful as agents will constantly be finding out new things that should be documented, and having a way to quickly add that to your KB is critical. Giving agents the ability to organize content as they see fit is also very useful as they may have slightly different needs or perspectives than other groups. Each space can categorize and label articles, allowing each group to decide how to best organize things. Agents also have the ability to search for articles directly from a ticket - this makes it much easier to use as they don’t have to dig around in menus and can instead quickly find what they need.
Workflows

Workflows are the series of stages a work item moves through in Jira. They represent the status of any given work item - for example “in progress”, “blocked” or “pending approval”. They're comprised of a few things, but before we dig into those we need to consider how they differ between team and company managed projects.
Team Managed Workflows
Team managed project admins can edit their workflows at any time, and the workflow is tied to a request type - not to an issue type This means they can't be shared across projects, but on the plus side it means admins can easily adjust things. Team managed projects do have some limitations (like no transition screens), but otherwise function similarly to company managed projects.
Company Managed Workflows
Company managed projects have their workflows tied to workflow schemes. These allow Jira admins to define a workflow across multiple projects, easily allowing them to scale operations and manage things. This means company managed project admins can't change their workflows, however, it does mean that it is much easier to manage workflows across an organization.
Company workflows also have some more options and features that are not available to team-managed projects.
Workflow Parts
Status - this is the status of the work item. They can be broken into three basic categories - to do, in progress and done. Note that status indicates where in the workflow something is - not how it is completed. Instead company managed projects have a resolution, which describes how the ticket was resolved. Resolutions are. A global setting and typical examples include won't do, done and duplicate.
Transitions - transitions are how issues move between statuses. A global transition allows any issue to move to a particular status, but more commonly custom transitions are used to control the flow of work. For example you ight not allow a ticket to move from open to done, instead it first must be in in progress.
Conditions - Conditions let you have specific criteria that must be met before a transition can be used. For example a specific person must have approved it, or a specific field is filled in.
Triggers - Automatically transition work items based on events - e.g. code commit it bit bucket.
Validatiors - validators can be used to ensure work items meet specific criteria before they're transitioned. For example you could require specific fields are filled in, or specific users are triggering the transition. These gives teams additional ways to enforce how tickets move, although they can be frustrating if teams don't know they're there.
Post Functions - post functions do something after the work item transitions. For example they can be used to clear the resolution when a ticket is reopened.
Properties - Properties allow more in-depth configuration of your workflow. They support other features and let you do things like restrict what someone can do in a specific status, or which resolutions are available.
We didn't get through all the workflow material, but we'll pick right back up with it during our next session after TEAM25 on April 14th!

📄 Advanced Editing | ACA-920 Confluence Essentials Session #3
Confluence has loads of advanced editing options like macros, AI and restrictions.
Last week we covered the basics of editing - including things like making pages and how to use the editing functions… now it’s time to get a bit deeper into what options are available for us when we edit pages.
Atlassian Intelligence (AI)

AI is available in Cloud Premium and Enterprise and offers some interesting tools to help us edit our content. At its most basic AI can help us generate ideas or create things like outlines. Personally I find this useful for helping get past writer’s block as it can help redirect my thoughts or help me get over being stuck. AI can also change the tone of what we’ve written, which can be helpful if our audience changes (or if we can’t get the tone quite right).

There are, however, more interesting use cases for AI that I’ve found. One is its ability to summarize content. Instead of having to read an entire page, you can have the tool simply summarize it for you. This is great for longer pieces of content, or, more commonly, when I’ve found something right before a call and I don’t have time to read everything. Summarize also works on recent changes - something I find to be very useful. Some pages change very frequently, so having the tool just summarizes what’s new since I last viewed it helps me stay on track and understand what’s changes.
Another useful tool is the ability to define terms and acronyms. At first I didn’t think I would use this all that much, but I’ve found it to be one of the better features… especially if I’m new to a team or unfamiliar with how they operate. (New joiners also find this very useful!). It helps us understand what these terms mean, and also gives us context for why the tool thinks that is the definition in the form of links and references (to help rule out hallucinations.
Macros

Our next stop in the advanced editing section was on Macros. These are essentially small programs or extensions that give us more functionality in Confluence. This can be a basic thing, like adding a coloured panel to a page, or a more complex thing, like mirroring content across multiple spaces. Macros are available either from the “+” menu in the edit toolbar, or by typing in “/” when editing (my preferred method).
There are many, many, macros, so we didn’t talk about all of them, but there were some favorites:
Table of Contents - dynamically builds a linked table of contents based on headers. One that I use on almost every single page I build as it makes it much easier to find things.
Excerpt - defines an area of the page that can be pulled into other pages. Allows you to mirror content - something I use frequently for “background” information that can be pulled into an index.
Expand - Puts a collapsible section on the page that can show, or hide, information in it. Helpful for breaking up the page and managing what’s visible.
Panels - Adds a panel to the page that includes colours. Useful for visually calling attention to something (like a warning).
Labels list - Displays a list of all the labels in a specified space. Helpful for managing labels (particularly identifying near duplicates).
I am working on a series of youtube videos that break down the common macros - so stay tuned for something that is (hopefully!) fun!
Restrictions

We finished out our advanced session by talking about Restrictions. This is probably the most confusing part of Confluence for most folks, so taking time to understand them is important! The ability to add a restriction to a page is a Space-level permission. This means your space admin can allow, or prevent, you from adding them (so if you don’t see them, chat with a space admin!).
There are three types of restrictions:
Everyone can view and edit - Anyone who has view access to the space can see this page, and anyone with edit access for pages can edit it. This is the default, and most permissive, permission.
Everyone can view, only some can edit - Anyone with view access to the space can view it, but only people specified in the restriction can edit the page. This is fairly common as sometimes only specific people (e.g. experts or certain folks) should be able to change things.
Only some can view or edit - The most restrictive. This hides the content from anyone who isn’t on the “view” list, and prevents editing unless you’re on the “edit list.
There are two considerations we have to keep in mind that commonly trip folks up (and given their importance are very likely going to show up on the exam if you take it!)
View permissions inherit down to children - This means if Page A has a child, and I restrict View access on Page A, it’s child will also be restricted.
Edit permissions do not inherit down to children - This means if I can edit Page A, it doesn’t necessarily mean I can edit it’s children.
Check out the recording below - and hope to see you in the next session!

🧵Atlassian Loom for Beginners
Loom is a great tool for recording and sharing information (plus it’s got a free tier!).
Despite chrome constantly crashing I had a great time showing folks that he basics of Loom. I find it a great tool for recording audio, video screen shares and screenshots, and even better it integrates natively with confluence and Jira - two tools I love in constantly.
The App(s)

Loom has two apps - a chrome extension and a desktop app (both downloadable here). My Loom journey began using the chrome extension, which is a great, lightweight way to record Looms (Looming?) and save them to your library (what Loom calls your storage). Of course this only works/makes sense if you happen to use Chrome, but if you do it’s a great way to quickly begin Looming (on second thought maybe I’ll call it weaving?). Clicking the Loom icon immediately opens up the recording panel where you can decide how you’d like to record. You can optionally include your screen, video and audio, letting you record the range from silent screen recordings to fully A/V walkthroughs of something.
Recently, however, I’ve started working with the desktop app, which is a bit beefier in terms of size, but offers more features(namely recording and screenshots via hotkeys, drawing on screen and capturing mouse clicks). The additional features have made it more attractive (especially the hotkeys and capturing mouse clicks) as they speed up by workflow and make it easier to clearly indicate what I intend to share.
Library

Once recorded Looms (what I'll call a screenshot or recording from. Loom) are stored in your Library. This is basically cloud storage that you can organize to easily keep track of Looks, but also let's to easily share and collaborate. Collaboration takes the form of comments, @ mentioning and shared-editing (more on editing below). Comments can be dropped on an overall Loom, or at specific timestamps (something I find really useful when I need to point out a specific question or clarification).
In addition to your Library you can also add Spaces to Loom. These function similarly to a Confluence space and let you organize content by whatever grouping you like (team, department, product, etc). Spaces can be public or “closed”. Everyone in your workspace can see all open spaces, but have to be invited in to see closed spaces. This lets teams keep sensitive information private, while being able to easily share with those who need it.
Editing
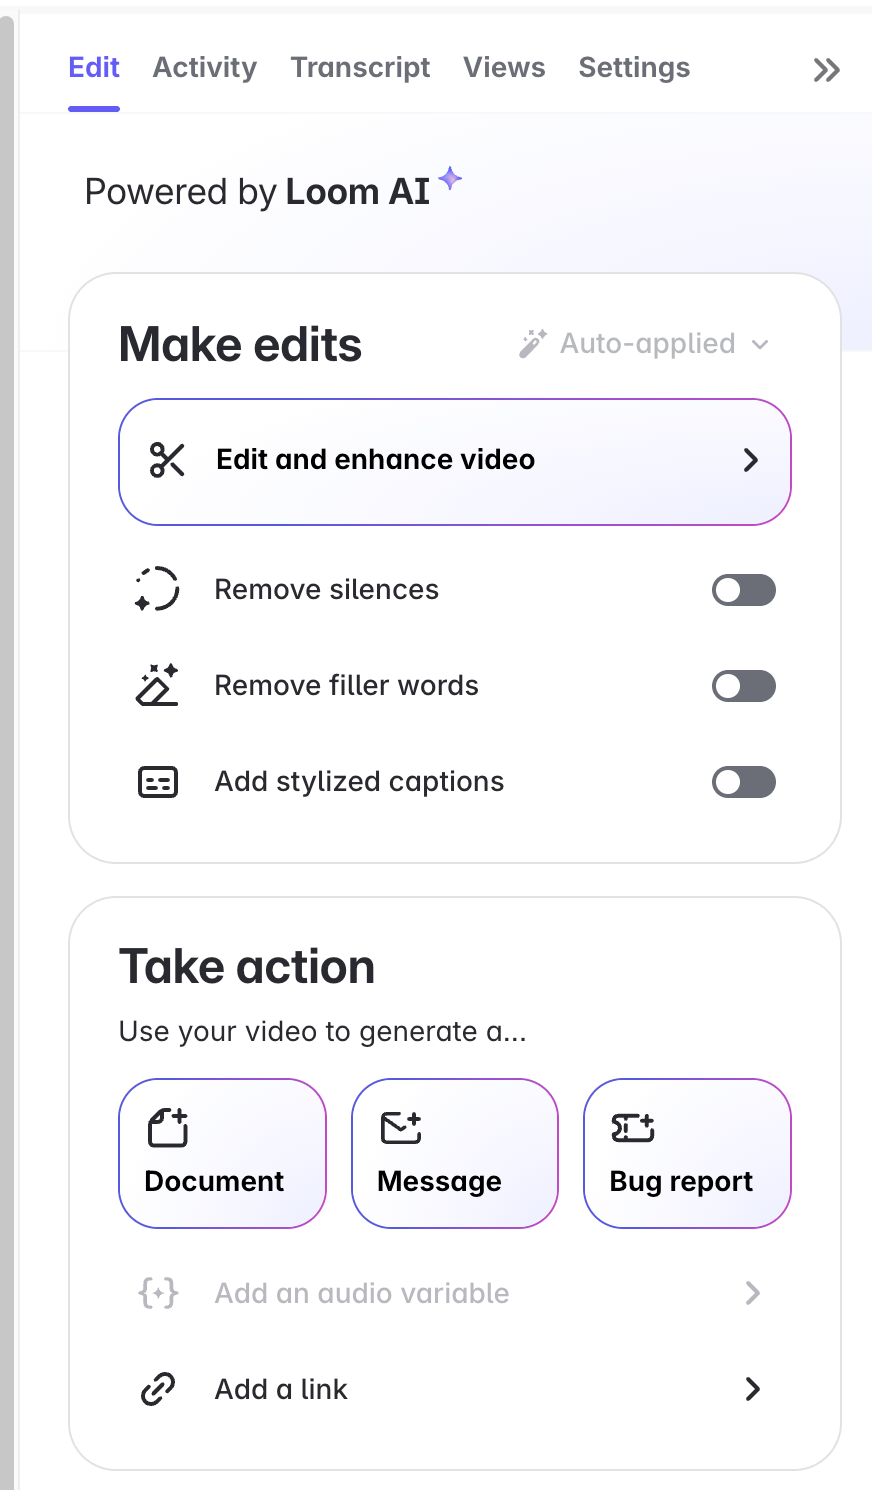
Once recorded Looms can also be edited in the cloud - either by you or shared editors - making it very easy to quickly create content. Other solutions I use will provide either recording or editing, so having both in one spot, and an easy to use interface, is a great win.
Editing can be as simple as cutting a few seconds of lead, or removing and replacing sections with other videos. You can also easily add shapes, texts and call outs to the video - as well as a button linked to a page or other content. With the premium tiers you'll also have access to some AI tools to help remove pauses and/or filler words (although personally I haven't used these).
Integrations

Loom is made by Atlassian, the same company that is responsible for Jira and Confluence, and their main focus is on helping teams work better, together. This is expressed in Loom by having native integrations with Jira and Confluence, letting you instantly start recordings from Jira tickets or Confluence pages. I’ve found this to be a really useful (and time saving) feature as I can create recordings in the moment I’m thinking about them vs. having to wait and figure it out later.
Pricing

As of writing Loom has a free tier which allows you to have up to 50 people in the same workspace. They’re limited to 25 total videos, but it’s a great way for smaller teams to quickly share visual information. As you go up in tiers you get access to more storage, editing and AI tools. Personally I haven’t used the AI too much so I’m unsure if it’s worth the cost, however, the editing features do make the premium tiers very useful.
Final Thoughts
Loom is a great, lightweight way to quickly record information and share it (even on the free plans). The premium features, like editing,make it worth the investment (especially if you use other Atlassian products). It’s definitely worth checking it out!
If you’re looking for a more in-depth look check out the video below:

Configuring Fields in Company & Team Projects | ACP-420 Jira Service Projects Study Session #7
Learn to configure issues and notifications in Jira Service Management
This week we continued our exploration of configuration, focusing on issues/work items and request Types, and this is another area that project admins will have a split experience in.
Team-Managed Projects

Team managed project admins can do basically anything they want in terms of issue type setup (note that technically there are only request Types in team managed). This is good for smaller teams, or in cases where a project is a one-off. Not having to go through a Jira admin and modify schemes (or add new ones) is a massive time-saver, and also frees up the Jira admins to handle bigger, more complex challenges. That said, it’s also a bad thing, as you might quickly end up with multiple team-managed projects floating around that all require administration… and due to how they work there’s no single way to manage them all.
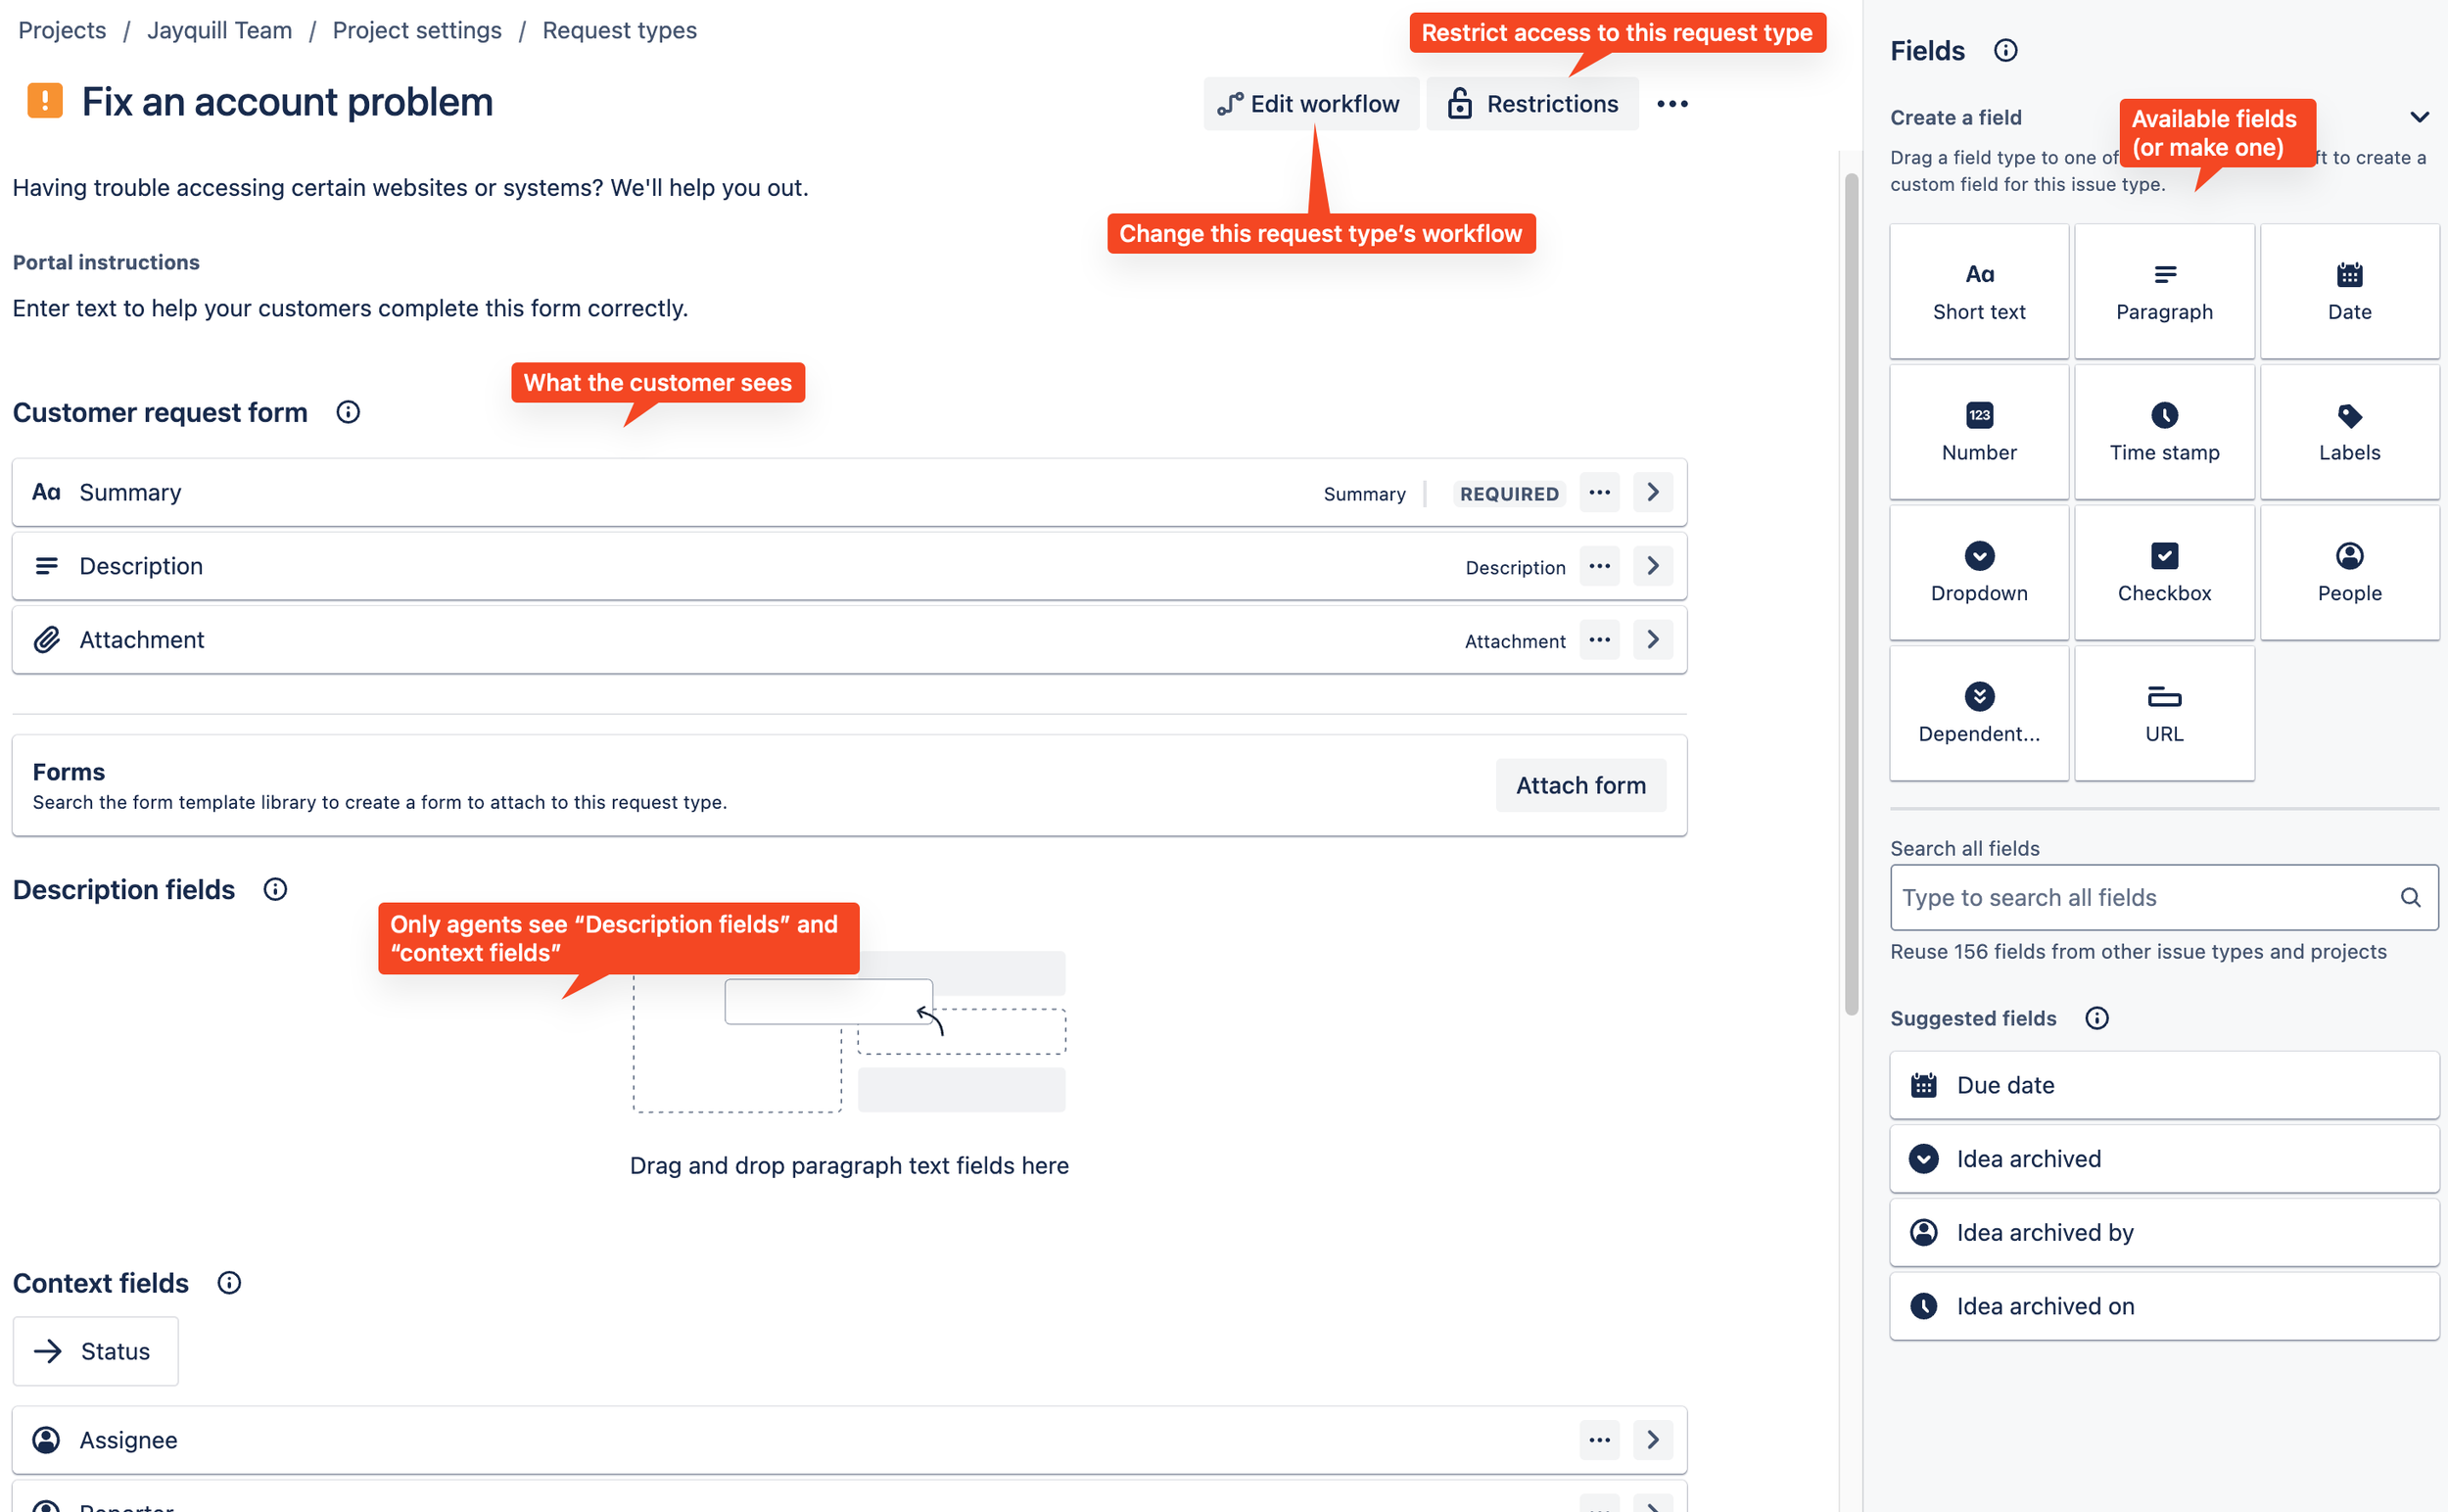
Team managed project admins can, however, add new request Types at any time. This gives them a ton of flexibility to quickly spin up new request types on demand. They can also make any changes they want to the fields and workflow (well dig into these next week) they want to. This includes recording fields as displayed to the agent (the issue view) and the customer (request view). Company-managed project admins can do this as well, however, it is important to note that these are spread across different tabs (“Request Form” and “issue view”) in company-managed projects, but they’re on a single screen in a team-managed project.
Company-Managed Projects

Company managed project admins are much more limited in terms of what they can change. They can manage request types (including making new ones), but can't make new issue types, add fields, change screens or modify workflows. Also, any request type they create has to be linked to an underlying issue-type that’s available to the project (via the issue type scheme). This, in turn, limits the available fields to what’s connected to those issues types. This makes them entirely dependent on a Jira admin to help with updates. (Although they can't make these changes, understanding what is needed is very helpful as it makes it easier to file a request and work with a Jira admin to make those changes).
Company managed project admins can, however, control what fields are displayed on the request (as long as they're available on the underlying issues). They can also change the display name (what a customer sees) to make the experience a bit easier. They can also change the display name of workflow statuses, which seems like a small thing, but can have a bit impact on someone's experience.
Next week well pick up with emailed requests and then dig into knowledge bases and workflow setup! After that there's a week break for TEAM25 (if you're going let me know, I'd love to connect there!).

Pages and Basic Editing - ACA-920 Confluence Essentials
Pages are the cornerstone of Confluence - so understanding them is critical!
Pages are the basic building block of Confluence and what many of us think of when we think of Confluence. They’re basically Word or Google docs and allow us to create a wide range of information that we can easily share with users.
Page Creation

An important thing to remember is that pages are created under whichever page you have open. This means if you make a page while you’re viewing the home page, it will get dropped at the bottom of the Hierarchy under the home page. If you make a page under one called “design” it will automatically become a child of Design.
This confused me for years…
And is why I don’t like that “+Create” button that’s at the top of everything! I find it much too easy to forget where I’m at and make a page under some random bit of content. That said, it does create the page. My preferred method is to use the “+” buttons in the Hierarchy as I know exactly where the new page is going (under the page I clicked the “+” next to.
Pages can be created in a few ways, but most commonly folks use the “Create+” button that’s clearly visible at the top of Confluence (and basically impossible to lose!). Personally this isn’t my favourite way of creating pages - mostly because when I started using Confluence I started using the “+” button in the Content Hierarchy… but also because it can be easy to “lose” a page when you create it this way.
Child Pages

A great feature of pages is they can be nested under other pages. This allows you to quickly organize content visually, making it much easier for folks to browse through what you’ve created. For example, you can nest all the “Policies” under the “Policy” page. This makes it easier for content creation (since folks know where to put something) and content consumers (since they can find stuff). There’s no known upper limit to the number of layers, but best practice is to limit this to no more than 4 levels to keep things manageable.
Editing Options

After you create a page you’ll see the editing menu, which includes a number of features to help you make content. One important thing to note is that you cannot change the font or text size! Instead, you can change the Text Style - mainly to various headers. I initially found it annoying that you can’t change fonts or sizes, however, it does simplify things (no more “serif” or “sans-serif” arguments!). Headers also serve an important function - they act as links on the page. This lets you easily hyperlink a specific header to someone, or, even better, connect it to various macros (we’ll dig into them more in a future session).
There are some other text options, like bold, italics, strikethrough and color that you can access, along with building lists and indents. The final section (“The good stuff”) contains options for things like adding hyperlinks (you can just CMD+V over text if you’ve copied a link to hyperlink it), insert images and attachments, and include things like layouts and emojis.
Templates

Templates are pre-formatted pages that make it much easier to quickly create (and consume!) content. Confluence comes preloaded with 140+, but Space Admins can also add and edit these to fit your specific needs. I highly recommend you review what templates you have, and then work with your Space Admin to modify as needed.

You can also search through templates, or easily browse with the categories - something I never knew!
Atlassian Intelligence
Atlassian Intelligence (or AI… see what they did there?) is included in Cloud Premium and higher and offers a number of different options to use AI to help improve writing and summarize pages. Personally I mainly use it to summarize things since I’m (sometimes) too lazy to read, but it does offer some great built-in options to leverage AI to speed things ups.
Wrap Up
Our next session is March 28th at 6 AM PDT and covers Advanced Editing- I look forward to seeing you there, and check out the recording from this session below!

Fields, Screens and Schemes - Oh My! ACP-420 Jira Service Projects #6
Schemes, screens and fields! ACP-420 study sessions #6!
Schemes! I definitely tripped over my own tongue with this one... Issue type screen scheme is way too hard to say.
Beyond not being able to say them properly I personally find them incredibly confusing! Mainly this is because I have been a Jira admin before... This means my hands on skills are lacking. I picked up small amount here's and there as I worked with the Jira admins though, and event that little bit was incredibly useful. Even just understanding that schemes are a thing is helpful as it makes it easier to talk to someone else about updating the system.
That said, this means is I need to dedicate more time to studying this part of the exam than I do for others (check out the new acp-420 page for some things I'm doing to drill this in). I’ll also be spending some time mapping out how all these schemes relate to each other. I find that visually drawing things helps my mind keep them separate.
Schemes and Fields, Oh My!
Schemes, however, are very important for us to understand as they are the shared configurations in Jira. They allow us as admins to create specific settings and then apply them across projects. For example all of our support projects could share the same issue types, workflows, screens and fields. Then, when we need to update them we just update it nice and it applies everywhere.
Fields, while not a scheme, are where a lot of this starts. After all, when I think of Jira I immediately think of all the information I need to fill out. One thing to remember is that fields aren't directly applied to projects or issue types. Instead they're grouped into screens. These screens are then added to a screen scheme which can be applied across projects.
There’s also two flavours of fields:
System Fields - these are default in Jira and tend to be critical. Things like Summary, Description and Key fall into this bucket
Custom fields - These are fields you create
Most of the settings we’ll cover here show up under “Issues” under the Settings menu:

Schemes for projects
There's seven total schemes that impact projects, with issue type security schemes being optional. Each of these let us control different aspects of the project.
-
Notification schemes allow you to define what notifications are sent out when and to who.
-
Priority schemes allow projects to have a different list of priorities. While this doesn’t seem like much it can have a huge impact on end users!
Personally I find a lot of folks frustrated at having to use the same list of priorities as everyone else (it also tends to get long… and repetitive…). This scheme lets you break out different lists of priorities for different projects.
It also applies to Team-managed projects!
-
These allow you to associate screens with an issue operation (e.g. view/edit/create). Basically they tell Jira which screen to use for those actions.
For example, you might have one specific screen displayed when creating bugs, but a different one available when editing bugs.
-
This defines what permissions are provided to what individuals, groups or roles in a project. Setting this up helps ensure that similar projects get similar permissions, making a project admin’s job a lot easier.
While the project admin can’t directly edit permissions they can assign roles, so ensure this is setup to support them!
-
This scheme defines the issue types available to a project.
For example your Project Management projects could have Epic/Story/Subtask while your Support projects get Bug/Incident/Request.
-
This scheme connects your field configurations (how a specific field behaves, e.g. hidden, required etc) to a specific issue type.
For example the “priority” field could be hidden on Bug tickets by default, but displayed on Project tickets.
Schemes for Issues
Three schemes apply directly to issues. These allow us to control things like the workflow specific issue types fulfill.
-
This scheme ties fields you’ve created to specific issue types. For example, you may have a “Symptom” field. In order to make it available to an issue you first have to add it to a Field Config scheme, and then tie that scheme to the issue type.
-
This scheme controls the workflow a given issue type uses. For example, the Bug issue type may have a specific set of statuses it moves through, while the Story issue type has a completely different set.
This workflow allows you to standardize the flow of specific issue types across projects.
-
While the Screen Scheme associates screens with operations, the Issue Type Screen scheme associates them with issue types.
For example you might have a Screen Scheme that contains specific fields for “Create” and then apply that to specific issue types via an Issue Type Screen Scheme. A different Issue Type Screen Scheme could apply different “Create” screens to other issue types.
But what about Project Admins?
Jira admins don't get to have all the fun though. Project admins can control the request screens by adding, removing, and managing fields that appear on request Types with is issue layout. This allows each project to choose what order fields are displayed in, what name is display to the customer and some other options. Giving this local control to project admins makes it much easier for them to handle day to day requests to improve their project.. although they still need to work with a Jira admin to add fields, change workflows and the like.
Each screen scheme gets one layout (which the project admin can manage) per project (something we need to keep in mind as Jira admins!). Project admins will be able to modify the “view” screen by adding, removing and reordering existing fields (but they can’t create new ones). Project admins can also hide empty fields, which can help clean things up for teams that don’t need every field in their project.
There is an important note in Atlassian’s training “Project admins can only add fields that exist in their project’s View screen configuration. If they remove a field from the issue layout, the field still exists in the View screen configuration. It just isn’t visible for that particular project.”
FAQ
What is a good way to name my schemes?
It can get confusing quickly! There’s some different ways, but folks typcially rename the default to something like . Project key - type — example : ABC-SS for the ABC project Screen Scheme
How do I change priorities??
There is a Priority Scheme that allows you to change priorities based on the scheme used.
What is the new name for “issue”?
Work item… although I bet I’ll still call it “issue” for a while…

Permissions and Roles | ACP-420 Jira Service Projects
Dive into permissions and roles!
Aren't time changes fun? Apologies to the folks who missed any/all of session 5 due to the time change... Luckily we have about 6 months before we get to do it again! (recording below if you missed out!)
Session 5 dug into permissions and roles. Personally I have to handle questions related to these topics on a weekly (sometimes daily) basis, so they are close to my heart. This also takes up 14% of the exam (but feels like half of my day sometimes!).
Check out the info below for more about what we covered, including the FAQ that folks had.
-
Before we get into how they work, you'll want to consider why you need them. It's very easy to dig in and start building roles or schemes. Resist the urge! Instead, step back and talk to your team and stakeholders about what is needed. I start by understanding the types of people who will be using Jira. Examples include agents, auditors, managers and the like. This is essentially building your list of roles, which will be useful when you start building.
Once you understand the groups you can determine what they need to do. For example, some groups may need the ability to respond to customers, while others should only be able to view tickets. This mapping process can feel arduous, but is an important step in understanding your teams needs.
This can take a while, but at the end you'll have a blueprint of what you'll go build. This makes it much much easier since all you'll have to do is push the right buttons - all the hard part (the thinking) is already done.
-
Permissions are layered, like an onion! On a day-to-day basis I regularly only interact with these at the Project level, however, as admins we need to understand what falls into each layer, and be ready to troubleshoot issues that can span levels.
Organization - At the top is the organization level. This layer control things like the ability to @mention, or access the instance.
Product - Next comes the product - e.g. Jira service management. This level mainly allows you to manage who can use the product in your org.
Project - Next is project level. This is where most folks will have access as it allows you to be a project admin. Here you can control things like roles, customer access and the like.
Issue - The last level is the issue layer. Typically I don't see this level being used as it adds more complexity and most of the time you don't need to lock issues. That said for environments with sensitive data (e.g. hr, finance etc) locking issues is important.
While there aren't 'gotcha' type questions on Atlassian exams, we do need to be careful and understand nuances to access. For example, 'assignable' and 'assignee' are both required permissions to be assigned a ticket (the first allows you to be assigned to a ticket, the second allows you to assign a ticket). Nuances like that are important for the exam, but also as a an admin to support our teams.
Some nuances we should keep in mind include:
Jira Admins are determined by who has access to the “jira-admins-(sitename)” group, or assigning a user to the Jira Admin product admin role
“browse users and groups” lets people @ mention users, select users from picker fields, share issues and see names. It does not prevent folks from assigning issues (I ran into this at work recently!)
“Browse projects” is the most important permission (according to Atlassian! :D) as it determines who can see a project and issues… without it you can’t see anything, regardless of your other permissions.
In order to edit due dates and rank issues you need both schedule issues AND Edit issues
Service project agents only applies if you’re in JSM
Some perms can be disabled globally like liking, watching and voting.
-
I think of roles as types of people that work in Jira. There are four roles that come with Jira, and we can't remove them - admin, agent, collaborator and customer.
Confusingly team and company managed projects have different names for them…for example 'agent' in team managed and 'service desk member' in company managed.
That said each role contains the appropriate permissions for those types of people. Agents, for example, can open and edit tickets. Collaborators can open, and post internal comments, but not edit. As an admin in a team managed project you can edit roles, but jna team.managed project you can't (unless you happen to be a Jira admin too).
We aren't, however, stuck with just the roles were given. We can create new ones. This may require a Jira admin, but once they're created project admins can assign them to people, which indirectly allows project admins to control permissions. These roles can be incredible useful in meeting needs of your team, which makes understanding what they need to do and why even more important.
Next week we'll get into, looking forward to seeing you there!
FAQs
Why are roles name differently in Team and Company managed projects?
I have no idea! It is a bit confusing though…
How can project admins manage permissions in Company-managed projects?
They can indirectly manage permissions by assigning Roles. This is where it’s important to have a good relationship with your Jira admin so they can partner with you to build Roles that make sense for your team.
Why is “schedule issues” necessary to re-order issues on a backlog board?
This is a great example of a non-intuitive thing we have to just know. From what I understand it has something to do with how Jira stores rank order information… does it make sense? not really… Do we need to know this to help folks? yup.
Check out the session recording here

Services, SLAs, and Permissions - ACP-420 Jira Service Projects study session #4
We covered services, SLAs and permissions for Jira Service Management projects
Study session 4 is in the books! We covered three topics (detailed below), and will pickup with permissions next week since we ran out of time.
Next Week (Session #5)
IMPORTANT - Daylight savings ends (or begins? Not 100% sure how this works) this weekend. Please double check the time as it may shift by an hour.
Session #5 will pickup where #4 left off with permissions. Then we’ll get into:
Roles
Adding agents and customers
Team-managed permissions
Issue types, fields, screens in Company-Managed projects
What did we cover
-
Project admins are able to turn on/off individual features within a Jira service management project. For example, if your group doesn’t use Services, just click the rocker to disable it. This has a number of benefits, but mainly it won’t clutter up your screen and it won’t confuse users with things they don’t need.
That said, it can be frustrating if something is missing and you don’t know why!
-
Services are things your team provides or supports. Some examples include databases, APIs and servers. Services can be grouped into Tiers, with Tier 1 being the most critical, and Tier 4 being least critical (e.g. folks won’t realize it’s offline). Services can also be linked to other services, for example, your website may depend on an API to work.
Adding services to Jira service management lets your team more easily manage them as they can easily see what services there are, what tickets impact which ones, and how they relate.
For example if the website is offline, you can easily see it is dependent on a specific server, and what issues impact that server.
-
Service Level Agreements (SLAs) are agreements teams with with h customer groups on how quickly something is addressed. For example you might agree an account reset should be done inside two hours, or a server outage will be worked on continuously until it's solved.
Jira service management allows us to define any number of SLAs, each of which can have different goals and different time targets. The tickets impacted by any given SLA can be defined by JQL, which means basically any grouping of ticket can be targeted. Within that you can break down specific time targets (how long someone has to meet the goal).
SLAs also contain conditions, or rules when they start, pause and stop running. Typically SLAs begin when a ticket is created, however, this can be tied to some actions (assignment, comment, etc). Pausing an SLA is useful when the team is blocked (commonly info this when I'm waiting for the customer to reply). Stopping an SLA typically happens when a ticket is closed, but could also happen when a specific status is met or action taken.
Finally, SLAs have calendars, which tell it which day(s) and time (s) to be counting down and a group can have any number of calendars. For example your 'account' tickets may use a 9-5 calendar while your 'outage' tickets may use a 24/7 calendar.
Regardless of your initial setup I highly recommend making time on a regular basis (e.g. quarterly) to review SLAs and ensure they still meet your needs.
-
We didn't get all the way through permissions but I'd highly recommend spending extra time here. Not only do I think it will show up on the exam, it's a common problem I run into in 'the wild', so the more we understand about how permissions work, the easier we can make others lives.
There's 4 levels of permission, org, product, project and issue.
Org - access to your orgs entire instance. Allows control of things like admin, @mentioning and others.
Product - ability to control access to a product (e.g. Jira service management)
Project - ability to manage and control a project. This is typically the highest level of access I've had and allows things like modifying request types, changing rules, and managing SLAs.
Issue - it is possible to restrict access to issues. Typically I prefer not to do this as it complicates things, but it can be necessary (e.g. for HR tickets).
Study tip
Keep Jira up on another screen or yab and switch into it to practice as you study. This will help cement ideas and remember things better.
FAQ
Do services have to be linked to a physical thing?
No! Services can be a physical thing, like a server, but are also typically non-physical things like API, websites etc.
What is camel case?
A way to notate fields and other information without spaces. (many systems don't allow spaces in names). Typically the first letter is lower case, and the letters of new words are upper. Examples:
jiraServiceManagement
pronounceJQLLikeJayquill (ok, that ones silly)
Can SLA's be tied to Issuetypes or just Request types?
Either! SLA's can be tied to any filter you can describe with JQL - so you can define a JQL query to pull tickets by either request, or issue, type... or almost anything else.
Can you use Atlassian Intelligence to build SLAs?
Not yet :(
Can we prepare ourselves in just a month for the exam?
In general I wouldn't recommend it as there can be a lot to learn! That said, if you can dedicate a lot of time to studying, practicing and understanding this can be possible. Personally I like to take 2-3 months to prep, but others can go faster.
Why am I limited to a single workflow per request type?
On a technical level I believe Atlassian limited this to ensure tickets know which path to follow.
On a process level this makes also makes sense as any give type of request should follow the same workflow - e.g. under what circumstance would a "password reset" require an entirely different set of statuses? If it does, it's likely a different request.